Správa autorů
Systém autorů PrestaBlog jde daleko za jednoduchou atribuci článků. Nabízí detailní správu přístupových práv back-office, nezávislou na oprávněních PrestaShop, a umožňuje vám prezentovat přispěvatele vašeho blogu na front-office.
Proč používat systém autorů
Systém autorů řeší několik potřeb:
- Spravovat redakční tým se specifickými právy (písci, editoři, moderátoři)
- Přesně kontrolovat, kdo může upravovat, publikovat nebo mazat články
- Zobrazovat přispěvatele na vašem blogu (volitelné)
- Vizuálně identifikovat odpovědi autorů v komentářích
- Vytvářet stránky autorů se seznamem všech článků přispěvatele
Můžete povolit systém správy práv, aniž byste nutně zobrazovali autory veřejně: to je užitečné pro organizaci týmu v back-office, aniž by to bylo viditelné vašim návštěvníkům.
Obecná konfigurace autorů
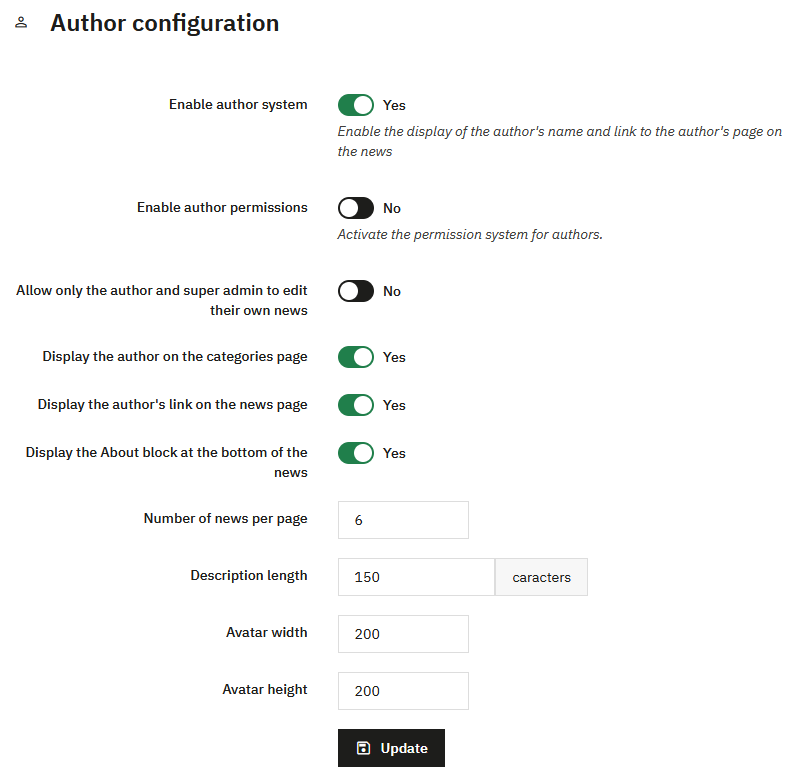
Aktivace systému autorů
Povolit systém autorů
Povoluje zobrazení autorů (a jejich odkazu) na novinkách front-office. Následující možnosti vám umožňují přesně kontrolovat, co se zobrazuje.
Povolit oprávnění autorů
Aktivuje systém správy práv specifických pro autory. Bez této aktivace nebudou oprávnění, která nakonfigurujete, aplikována.
Povolit pouze autorovi článku a superadminovi upravovat jejich články
Pokud je tato možnost povolena, autor může upravovat pouze své vlastní články (pokud mu výslovně nedáte právo upravovat všechny články v oprávněních).
Možnosti zobrazení
Zobrazit autory v seznamu kategorií
Zobrazuje jméno autora v seznamu článků kategorie na front-office.
Zobrazit odkaz na autora na stránce článku
Vytváří klikatelný odkaz na stránku autora, která uvadí všechny jeho články.
Zobrazit blok O autorovi ve spodní části článků
Zobrazuje biografický blok autora na konci článků (obrázek, popis, odkaz na jeho stránku).
Nastavení stránky autora
Počet článků na stránku
Počet článků zobrazených na stránce autora.
Velikost popisu
Maximální délka popisu autora (v znacích).
Šířka a výška obrázku autora
Rozměry profilového obrázku používaného v bloku O autorovi a na stránce autora.
Klikněte na Aktualizovat po konfiguraci těchto nastavení.
Vytváření a správa autorů
Seznam autorů
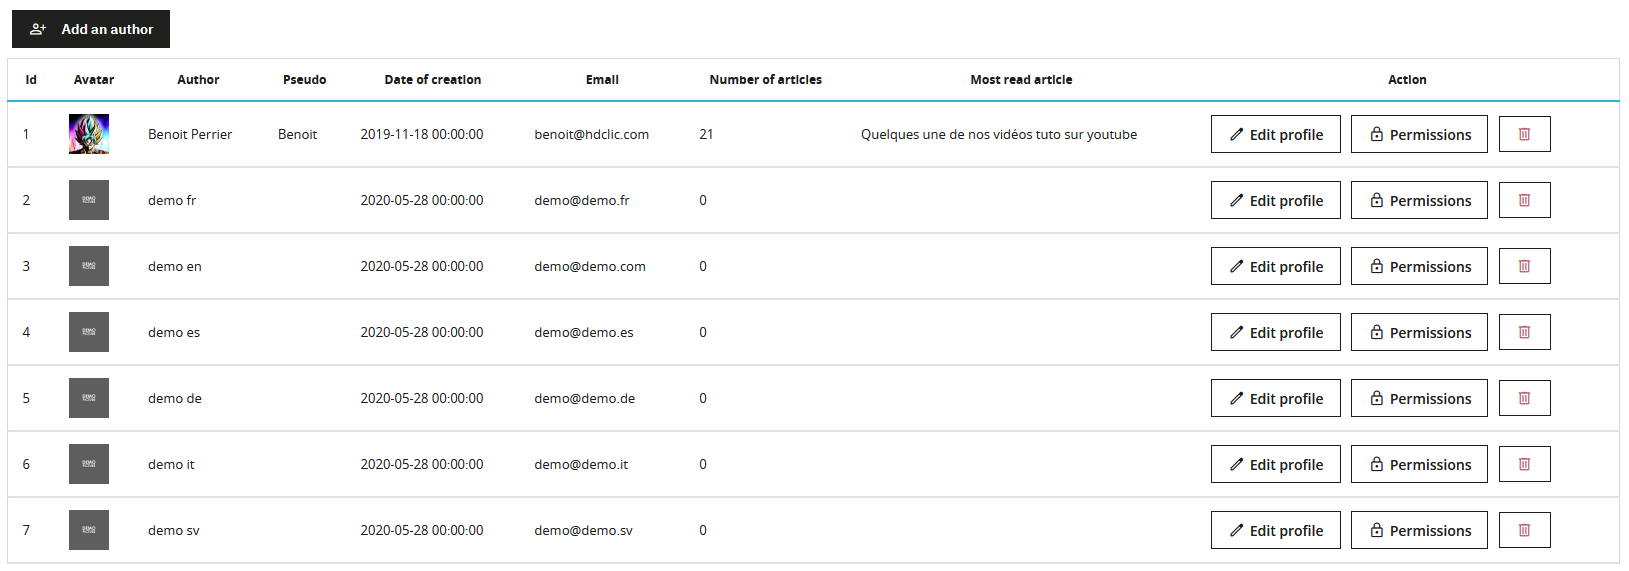
Seznam autorů zobrazuje všechny přispěvatele vašeho blogu s jejich hlavními informacemi:
- Avatar a celé jméno
- Přezdívka (používaná na front-office)
- Datum vytvoření
- Počet publikovaných článků
- Poslední publikovaný článek
Pro každého autora mají superadministrátoři k dispozici tři akce:
- Upravit profil: upravit informace autora
- Oprávnění: konfigurovat specifická práva tohoto autora
- Smazat: odebrat autora ze systému
Standardní autoři mohou upravovat pouze svůj vlastní profil prostřednictvím menu Autor > Můj profil autora.
Přidat autora
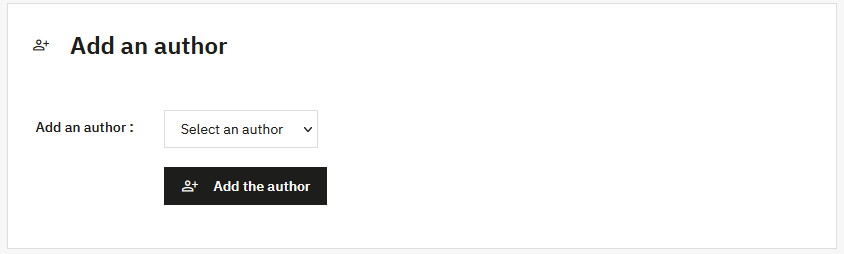
Pro přidání nového autora:
- Klikněte na Přidat autora
- Vyberte zaměstnance z rozbalovacího seznamu (všechny účty zaměstnanců PrestaShop jsou k dispozici)
- Klikněte na Přidat autora
Autor PrestaBlog musí být propojen s existujícím účtem zaměstnance PrestaShop. Nemůžete vytvořit autora bez přiřazeného účtu back-office.
Úprava profilu autora
Každý autor může upravovat svůj vlastní profil prostřednictvím menu Autor > Můj profil autora. Superadministrátoři mohou upravovat profily všech autorů ze seznamu autorů.
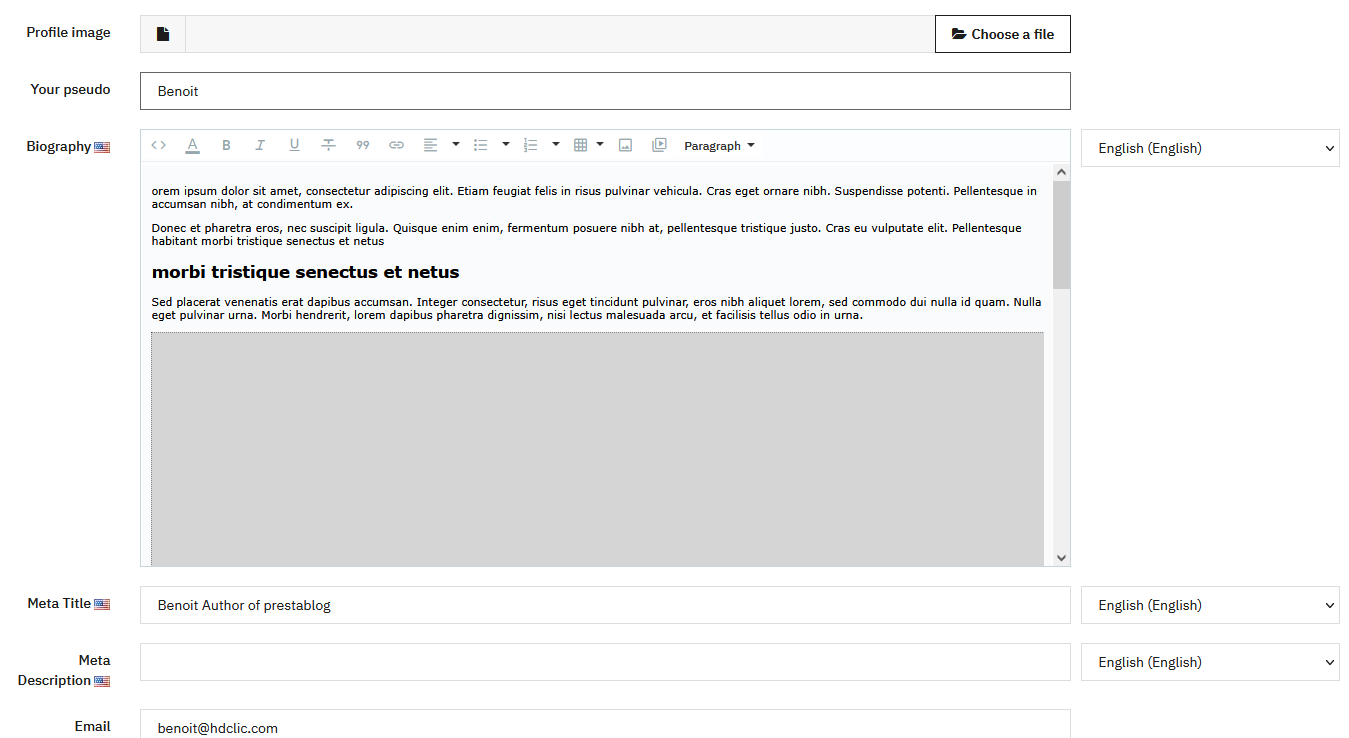
Profilový obrázek
Profilový obrázek
Přidejte profilový obrázek s rozměry nakonfigurovanými v obecné konfiguraci autorů. Obrázek musí mít správné rozměry, bez automatické změny velikosti.
Informace o profilu
Vaše přezdívka
Přezdívka zobrazovaná veřejně na front-office (není vícejazyčná).
Biografie
Popis autora, zobrazovaný v bloku O autorovi ve spodní části článků a na stránce autora. Tento popis lze obohatit textovým editorem a je vícejazyčný.
E-mailová adresa autora (pochází z účtu zaměstnance PrestaShop, nelze upravovat).
Nastavení SEO
Meta titulek
Meta titulek stránky autora (vícejazyčný).
Meta popis
Meta popis stránky autora (vícejazyčný).
Klikněte na Upravit váš profil pro uložení změn.
Správa oprávnění
Systém oprávnění vám umožňuje přesně definovat práva každého autora, nezávisle na právech PrestaShop. Pouze superadministrátoři mohou spravovat oprávnění.
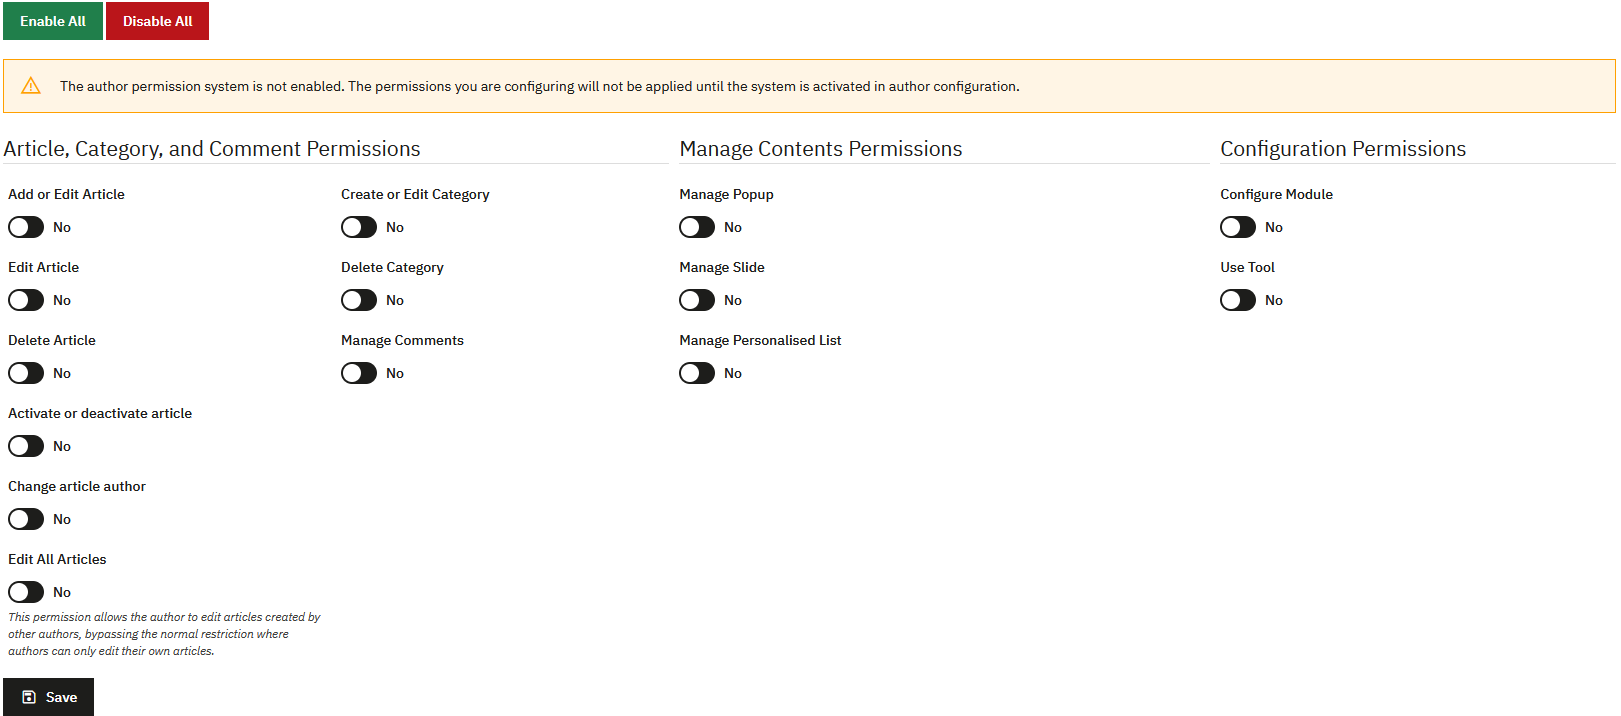
Oprávnění jsou aplikována pouze tehdy, když je možnost „Povolit oprávnění autorů“ aktivována v obecné konfiguraci. Varovná zpráva vás upozorní, pokud tomu tak není.
Ve výchozím nastavení nemá nový autor žádná oprávnění. Musíte je aktivovat manuálně podle potřeb.
Oprávnění pro články, kategorie a komentáře
- Přidat a upravit článek: umožňuje vytvářet nové články
- Upravit článek: umožňuje upravovat vlastní články
- Smazat článek: umožňuje mazat články
- Povolit nebo zakázat článek: umožňuje publikovat/odebrat z publikace články
- Změnit autora článku: umožňuje změnit autora přiřazeného k článku
- Upravit všechny články: umožňuje upravovat články vytvořené jinými autory. Toto oprávnění obchází omezení „Povolit pouze autorovi článku a superadminovi upravovat jejich články“, pokud je povoleno v konfiguraci.
- Vytvořit nebo upravit kategorii: umožňuje spravovat kategorie
- Smazat kategorii: umožňuje mazat kategorie
- Spravovat komentáře: umožňuje moderovat komentáře
Oprávnění pro obsah
- Spravovat pop-up okna: umožňuje vytvářet a spravovat pop-upy
- Spravovat slideshow: umožňuje spravovat slidy
- Spravovat vlastní seznam: umožňuje spravovat vlastní seznamy
Oprávnění pro konfiguraci
- Konfigurovat modul: umožňuje přístup ke vší konfiguraci PrestaBlog (Konfigurace, Bloky, Šablona, Obrázky, Komentáře atd.)
- Používat nástroje: umožňuje přístup k nástrojům (AI, Antispam, Import, Export, Regenerace obrázků, Sitemap)
Oprávnění PrestaShop pro zaměstnance
Kromě oprávnění PrestaBlog můžete konfigurovat práva zaměstnanců přímo v PrestaShop pro omezení přístupu do back-office pouze na blog. Tato kombinace umožňuje velmi přesnou správu práv vašich písců.
Proč konfigurovat oprávnění PrestaShop
Pokud chcete, aby měl písec přístup pouze k PrestaBlog bez možnosti přístupu k dalším funkcím vašeho obchodu (produkty, objednávky, zákazníci atd.), musíte konfigurovat jeho oprávnění na úrovni PrestaShop kromě oprávnění PrestaBlog.
Dvouúrovňová oprávnění
Oprávnění PrestaShop kontrolují přístup k menu a modulům back-office, zatímco oprávnění PrestaBlog (předchozí sekce) kontrolují specifické akce v rámci modulu (vytvoření článku, moderování komentářů atd.).
Vytvořit vyhrazenou roli pro blog
Pro zjednodušení správy můžete vytvořit profil (roli) vyhrazený pro písce blogu:
- Přejděte do Pokročilé parametry > Tým > Role
- Klikněte na Přidat nový profil
- Pojmenujte jej (například: „Písec blogu“)
- Uložte profil
Jakmile je profil vytvořen, můžete jej přiřadit svým zaměstnancům-píscům a konfigurovat jeho specifická oprávnění.
Oprávnění menu
Pro konfiguraci oprávnění menu přejděte do Pokročilé parametry > Tým > Oprávnění a vyberte příslušný profil.
V levé záložce Menu zaškrtněte pouze oprávnění nezbytná pro přístup k PrestaBlog.
Níže najdete všechna práva, která umožní správné použití PrestaBlog (jako na našem demu):
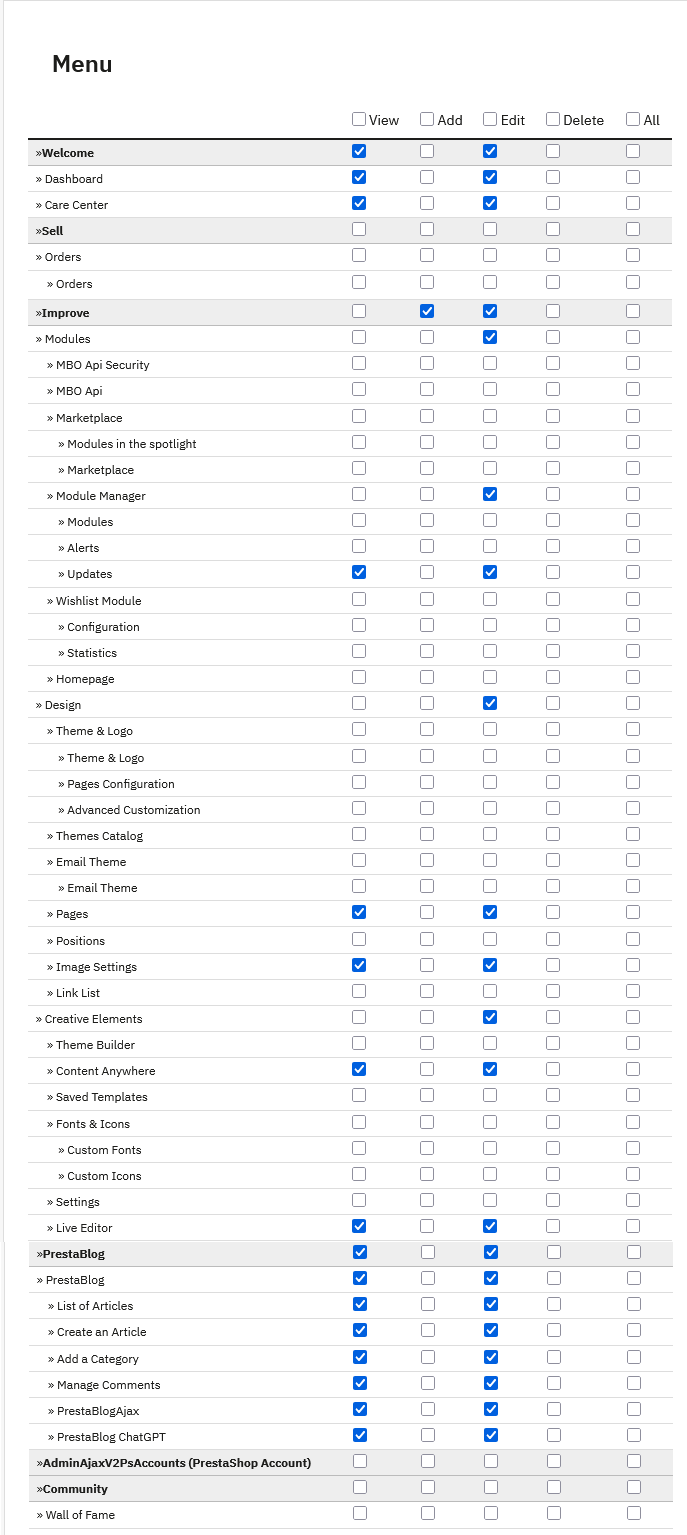
Minimální požadovaná práva:
- Welcome: View, Edit (vyžadováno pro přístup do back-office)
- Dashboard: View, Edit
Práva PrestaBlog:
- PrestaBlog: View, Edit
- Article list: View, Edit
- Create an article: View, Edit
- Add a category: View, Edit
- Comment management: View, Edit
- PrestaBlogAjax: View, Edit
- PrestaBlog ChatGPT: View, Edit (pokud používáte AI)
Dodatečná práva (volitelná, ale doporučená):
- Design: View, Edit
- Pages: View, Edit
- Images: View, Edit
- Live Editor: View, Edit (WYSIWYG editor pro psaní článků)
Pokud používáte Creative Elements:
- Creative Elements: View, Edit
- Content Anywhere: View, Edit
Popisky se mohou lišit v závislosti na verzích PrestaShop.
Oprávnění modulů
V pravé záložce Moduly stránky oprávnění nakonfigurujte přístup k nezbytným modulům:
- PrestaBlog: zaškrtněte View a Configure
- Creative Elements (pokud jej používáte k úpravě článků): zaškrtněte View a Configure
Souhrn konfigurace
Pro písce s omezeným přístupem k blogu:
- Vytvořte profil „Písec blogu“ v Rolích
- Nakonfigurujte oprávnění Menu pouze pro PrestaBlog
- Nakonfigurujte oprávnění Modulů pro PrestaBlog (a Creative Elements, pokud se používá)
- Vytvořte zaměstnance s tímto profilem
- Přidejte jej jako autora v PrestaBlog
- Nakonfigurujte jeho oprávnění PrestaBlog (předchozí sekce)