Nástroje
PrestaBlog nabízí několik nástrojů pro usnadnění správy vašeho blogu a zlepšení vaší produktivity. Tyto nástroje jsou přístupné prostřednictvím menu „Nástroje“ modulu.
Umělá inteligence (ChatGPT)
PrestaBlog integruje funkci asistence při psaní založenou na ChatGPT, vyvinutou společností OpenAI. Tato integrace vám umožňuje generovat nápady na články, psát obsah nebo vytvářet shrnutí přímo z rozhraní úprav článků.
Pro použití této funkce potřebujete účet OpenAI a platný API klíč.
Jak získat API klíč ChatGPT
Pro získání vašeho API klíče postupujte podle těchto kroků:
- Klikněte zde a vytvořte si nebo se přihlašte ke svému účtu OpenAI
- Vygenerujte nový API klíč nebo zkopírujte svůj existující API klíč.
- Uložte svůj API klíč bezpečně.
- Zvolte typ GPT, který chcete používat. Doporučujeme začít s možností GPT-4.
Pro podrobnější pokyny navštivte web OpenAI.
Konfigurace API ChatGPT
API klíč ChatGPT
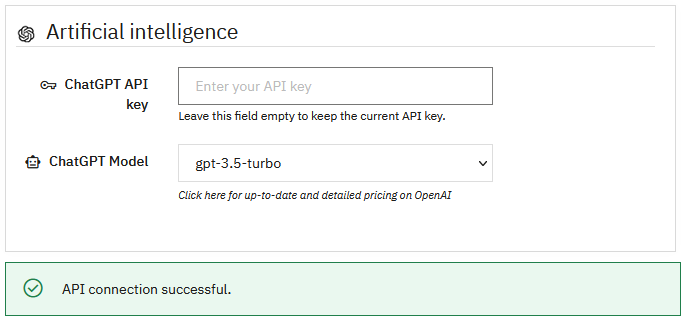
Zadejte svůj API klíč OpenAI do poskytnutého pole. Po uložení klíč již nebude viditelný v rozhraní z bezpečnostních důvodů: pole zůstane prázdné, i když je váš klíč správně uložen.
Pokud chcete upravit nebo nahradit svůj API klíč, můžete do tohoto pole zadat nový klíč.
Ponechte pole prázdné, pokud chcete zachovat aktuální API klíč a pouze změnit používaný model.
Model ChatGPT
Vyberte model ChatGPT, který chcete používat pro generování obsahu. Každý model má různé charakteristiky z hlediska výkonu a nákladů na použití.
Ceny OpenAI
Pro zobrazení podrobných a aktuálních cen různých modelů si prostudujte oficiální dokumentaci OpenAI.
Validace konfigurace
Jakmile jsou váš API klíč a zvolený model nastaveny, klikněte na tlačítko „Aktualizovat“ pro uložení konfigurace. Pokud je váš API klíč platný a připojení k API OpenAI je úspěšné, ve spodní části rozhraní se zobrazí zelená potvrzovací zpráva „Připojení k API úspěšné.“
Použití ChatGPT v PrestaBlog
Jakmile je konfigurace dokončena, integrace ChatGPT se stane dostupnou při vytváření nebo úpravě článku. Rozhraní asistence se skládá ze tří hlavních oblastí:
- Rozhraní konverzace AI: zobrazuje aktuální konverzaci s ChatGPT a ukazuje dostupné akce
- Výběr typu diskuse: zvolte cíl vaší interakce (generování nápadů, psaní článku, vytvoření shrnutí atd.)
- Oblast vstupu: zadejte své zprávy nebo požadavky na základě zvoleného typu diskuse
Viz sekce o použití AI v PrestaBlog pro více detailů.
Anti-spam
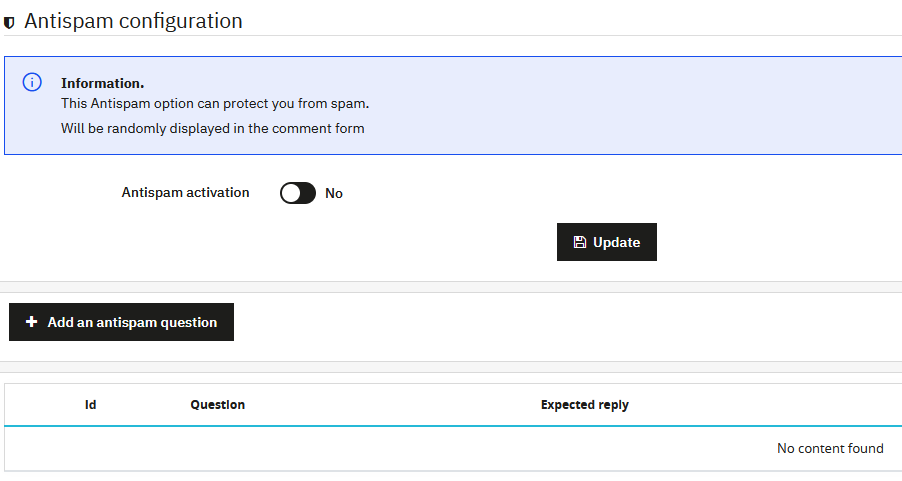
PrestaBlog integruje systém anti-spamu založený na vlastních otázkách. Tento systém poskytuje efektivní a bezplatnou alternativu k tradičním řešením anti-spamu.
Princip je jednoduchý: pro odeslání komentáře musí návštěvníci správně odpovědět na náhodně zvolenou otázku z těch, které jste vytvořili. Tento zábavný a přizpůsobitelný mechanismus efektivně blokuje spamové boty a zároveň zůstává přístupný vašim lidským čtenářům.
Poznámka
Tento systém funguje pouze s klasickými komentáři PrestaBlog.
Aktivace anti-spamu
Přepínač „Povolít antispam“ vám umožňuje globálně povolit nebo zakázat systém anti-spamu založený na otázkách. Když je zakázán, návštěvníkům nebudou kládeny žádné otázky a mohou komentovat volně.
Správa otázek anti-spamu
Souhrnná tabulka zobrazuje všechny otázky anti-spamu, které jste vytvořili. Pro každou otázku můžete zobrazit:
- Identifikátor (Id)
- Položenou otázku
- Očekávanou odpověď
Z této tabulky můžete upravit nebo smazat existující otázky, stejně jako povolit nebo zakázat každou otázku jednotlivě bez jejího trvalého smazání.
Přidání otázky anti-spamu
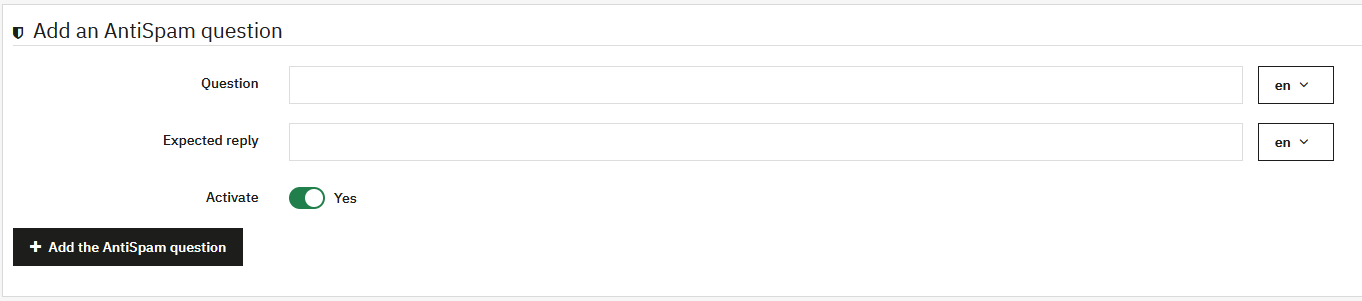
Tlačítko „Přidat otázku antispamu“ vám umožňuje vytvořit novou otázku. Formulář pro vytvoření nabízí následující pole:
- Otázka: otázka, která bude položena návštěvníkům (vícejazyčná)
- Očekávaná odpověď: přesná odpověď, kterou musí návštěvníci poskytnout (vícejazyčná)
- Povolit: umožňuje vám povolit nebo zakázat otázku
Tipy pro použití
Pro optimální efektivitu se doporučuje vytvořit více otázek anti-spamu. Čím rozmanitější otázky vytvoříte, tím obtížnější bude pro spamové boty obejít váš systém ochrany.
Příklady otázek
Uprednostňujte jednoduché otázky pro vaše lidské čtenáře, ale obtížné k uhodnutí pro robota:
- „Jakou barvu má obloha?“ (odpověď: „modrá“)
- „Kolik je 2 + 2?“ (odpověď: „4“)
- Otázky související s tématem vašeho blogu
XML Export
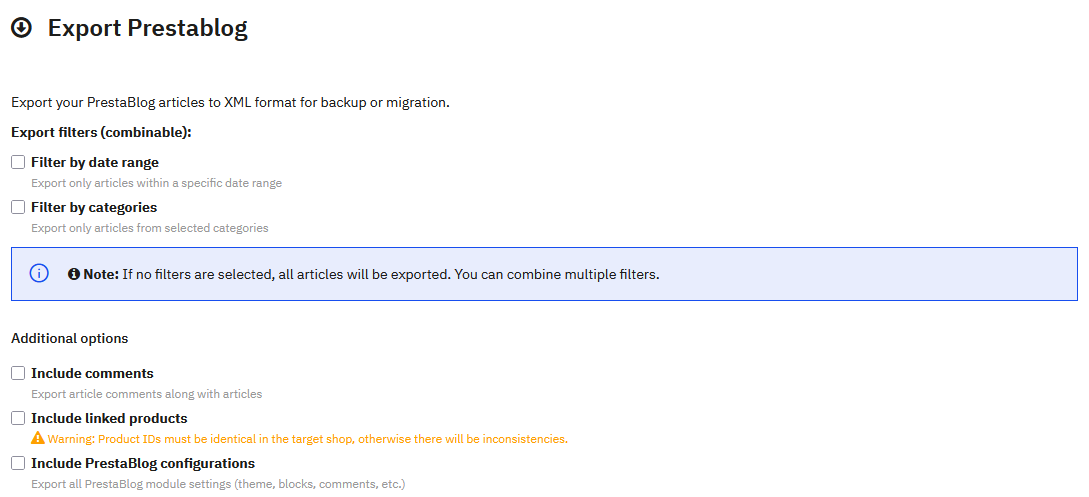
PrestaBlog vám umožňuje exportovat veškerý obsah ve formátu XML pro jeho zálohování nebo migraci na jinou instalaci PrestaShop. Tato funkce generuje XML soubor kompatibilní s průvodcem univerzálním importem PrestaBlog.
Filtry exportu
Můžete zpřesnit svůj export pomocí jednoho nebo více kombinovatelných filtrů. Pokud není vybrán žádný filtr, budou exportovány všechny články.
Filtrovat podle období
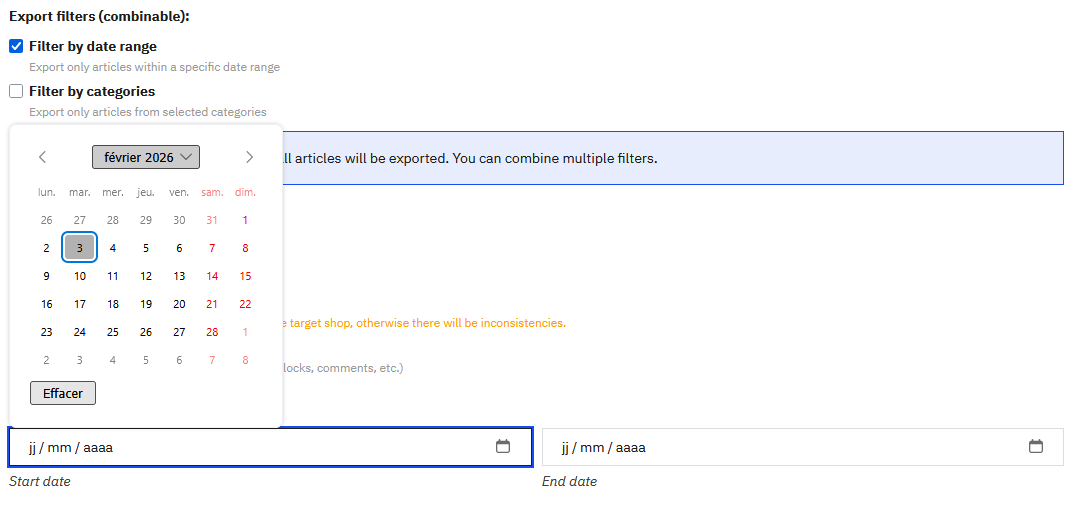
Tato možnost vám umožňuje exportovat pouze články publikované v určitém období. Interaktivní kalendář vám umožňuje snadno vybrat počáteční a koncové datum.
Filtrovat podle kategorií
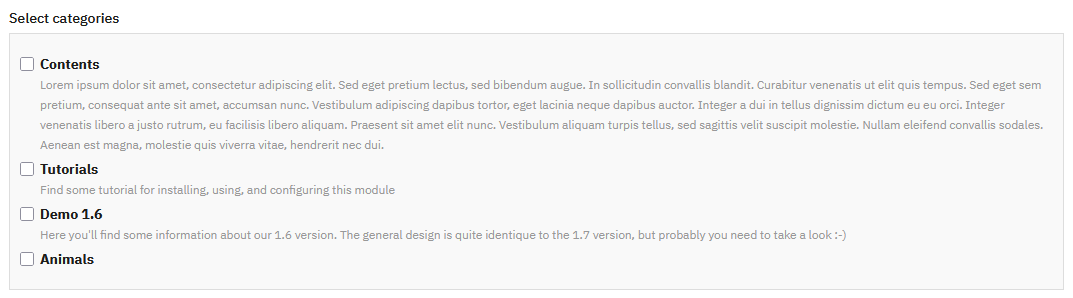
Tato možnost vám umožňuje exportovat pouze články patřící do určitých kategorií. Dva tlačítka usnadňují výběr: „Vybrat vše“ a „Zrušit výběr všeho“.
Dodatečné možnosti
Tři možnosti vám umožňují obohatit obsah vašeho exportu:
- Zahrnout komentáře: umožňuje export komentářů spojených s články
- Zahrnout související produkty: umožňuje export asociací mezi články a produkty PrestaShop
- Zahrnout konfigurace PrestaBlog: umožňuje export všech nastavení konfigurace modulu
Exportovaný obsah
V závislosti na vybraných možnostech může XML soubor obsahovat:
- Veškerý obsah článků a metadata
- Kategorie a jejich hierarchickou strukturu
- Asociace autorů
- Vícejazyčný obsah
- Hlavní obrázek každého článku
- Komentáře (pokud je možnost zaškrtnuta)
- Související produkty (pokud je možnost zaškrtnuta)
- Konfigurace modulu (pokud je možnost zaškrtnuta)
Generování exportu
Jakmile jsou vaše filtry a možnosti nakonfigurovány, klikněte na tlačítko „Export PrestaBlog“. XML soubor bude vygenerován a automaticky stažen do vašeho počítače.
Univerzální import
Univerzální import PrestaBlog vám umožňuje importovat články z jakéhokoliv správně strukturovaného XML souboru. Tato funkce má dvě hlavní využití:
- Import souboru exportu PrestaBlog: proces je z velké části automatizován
- Import článků z jiných blogovacích platforem: systém vás vede krok za krokem
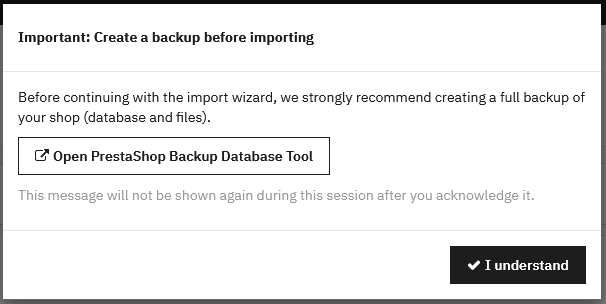
Před zahájením importu se důrazně doporučuje vytvořit kompletní zálohu vašeho obchodu (databáze a soubory).
Předchozí vytvoření autorů
Pokud váš XML soubor obsahuje články spojené s autory, musíte tyto autory vytvořit v PrestaBlog PŘED zahájením importu. Pokud autory nevytvoříte předem, články nebudou přiřazeny k jejich původním autorům.
Krok 1: Výběr souboru
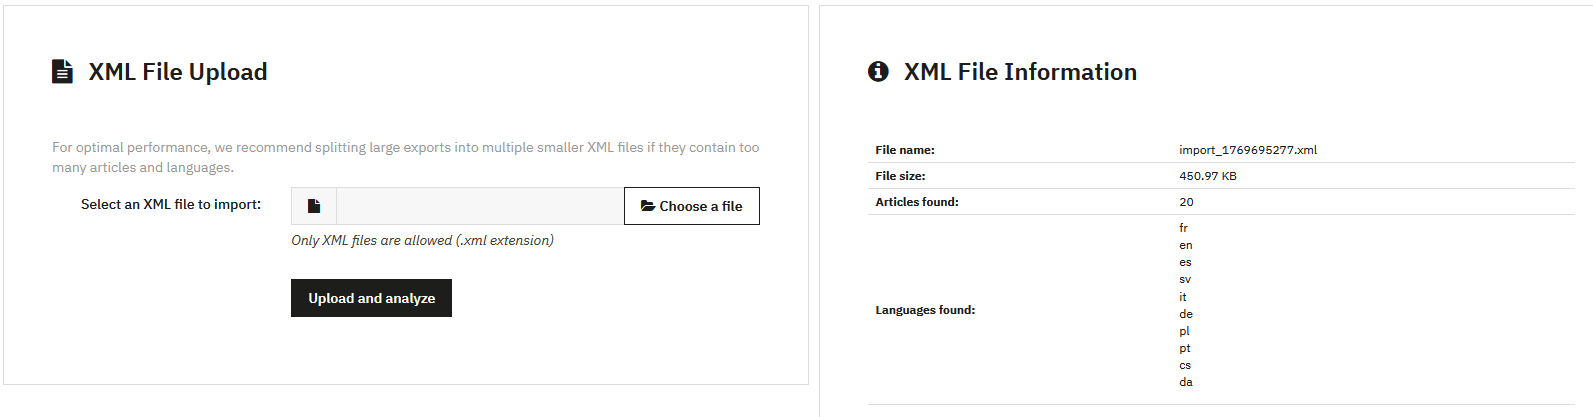
Prvním krokem je nahrání vašeho XML souboru. Jsou přijímány pouze soubory ve formátu .xml.
Jakmile je soubor nahrán a analyzován, zobrazí se souhrn s názvem souboru, velikostí, počtem nalezených článků a detekovanými jazyky.
Krok 2: Správa jazyků
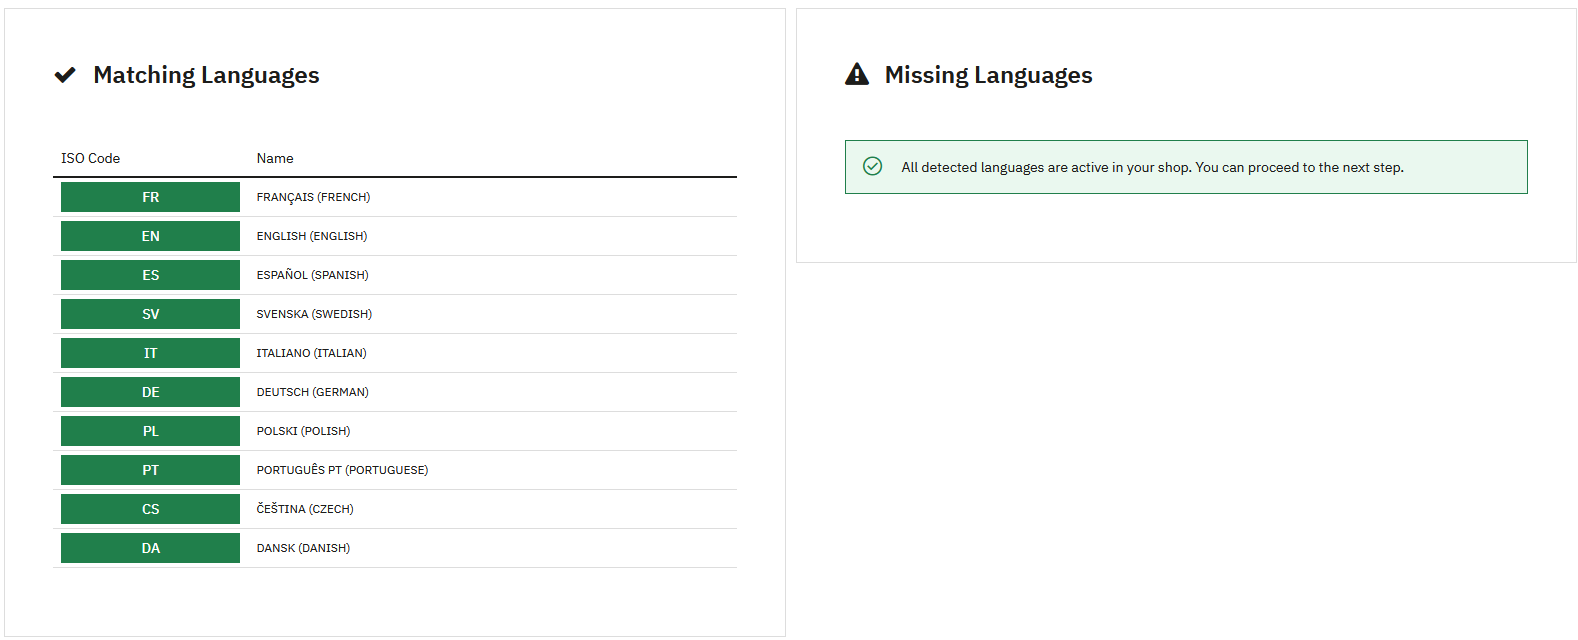
Tento krok spravuje korespondenci mezi jazyky přítomnými ve vašem XML souboru a aktivními jazyky ve vašem obchodě PrestaShop.
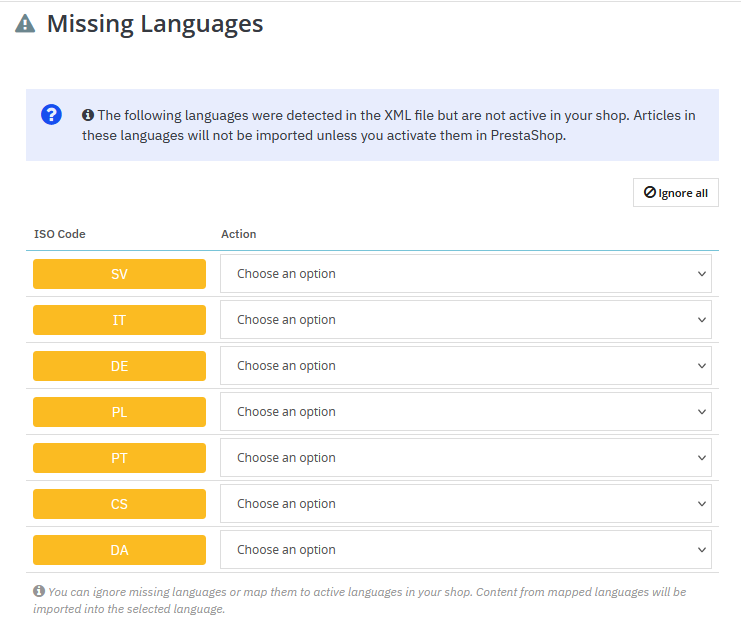
Pokud některé jazyky přítomné v XML souboru nejsou aktivovány ve vašem obchodě, musíte zvolit akci pro každý jazyk: ignorovat obsah nebo jej přiřadit k existujícímu jazyku.
Krok 3: Správa autorů
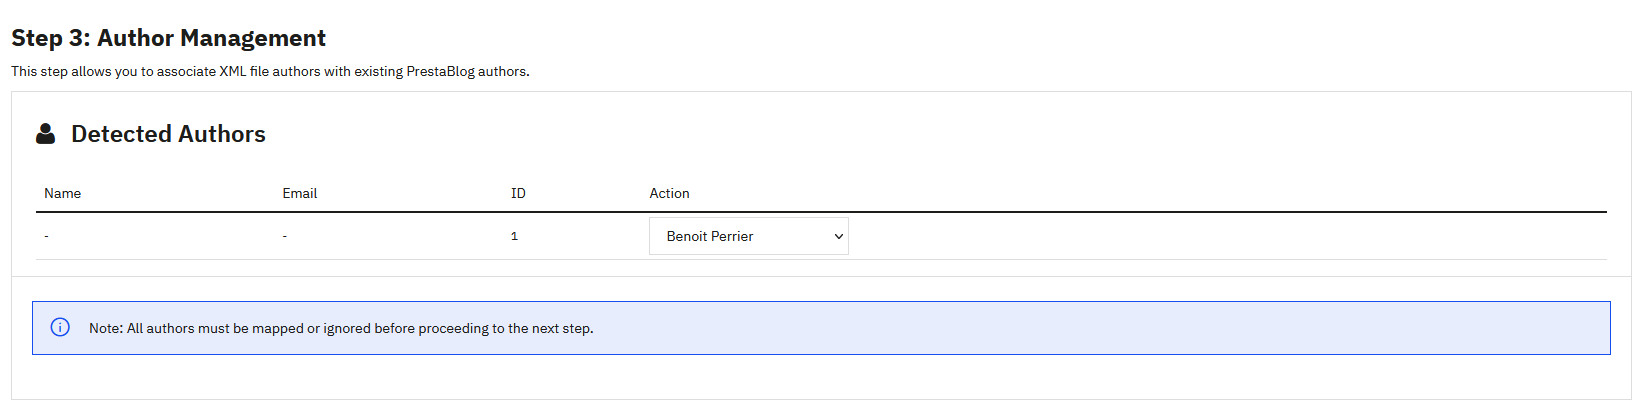
Tento krok vám umožňuje přiřadit autory z XML souboru k existujícím autorům PrestaBlog. Pokud jste předem vytvořili autory se stejnými ID, přiřazení je automatické.
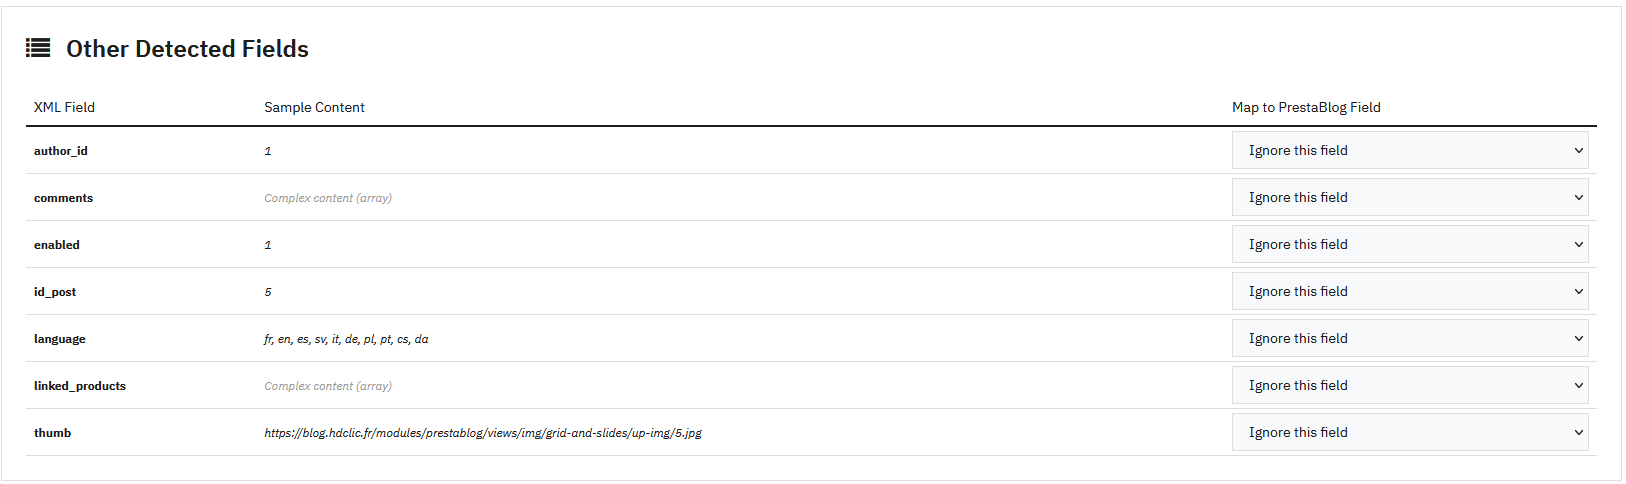
Krok 4: Mapování polí
Tento krok je nejsložitější v průvodci importem. Mapuje pole z XML souboru na pole PrestaBlog. Pro soubor exportu PrestaBlog je toto mapování automatické.
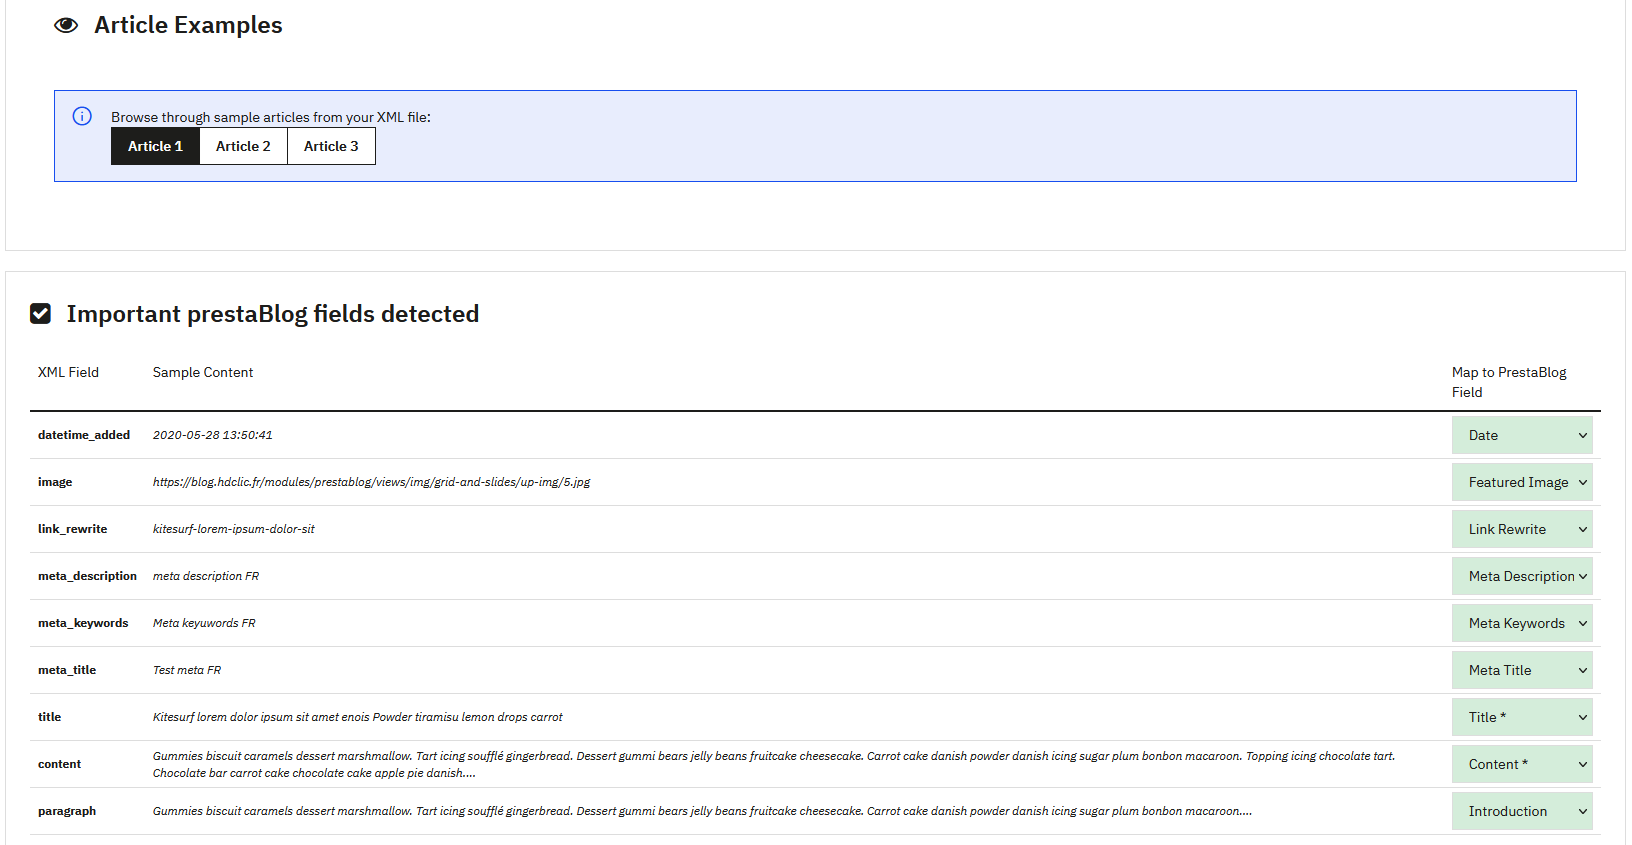
Oblast zobrazující příklady článků vám umožňuje zobrazit náhled obsahu před importem.
Správa ID článků

Možnost „Vynutit zachování ID článků“ vám umožňuje zachovat původní ID při importu. Tato možnost je užitečná pro zachování SEO a externích odkazů.
Mapování kategorií
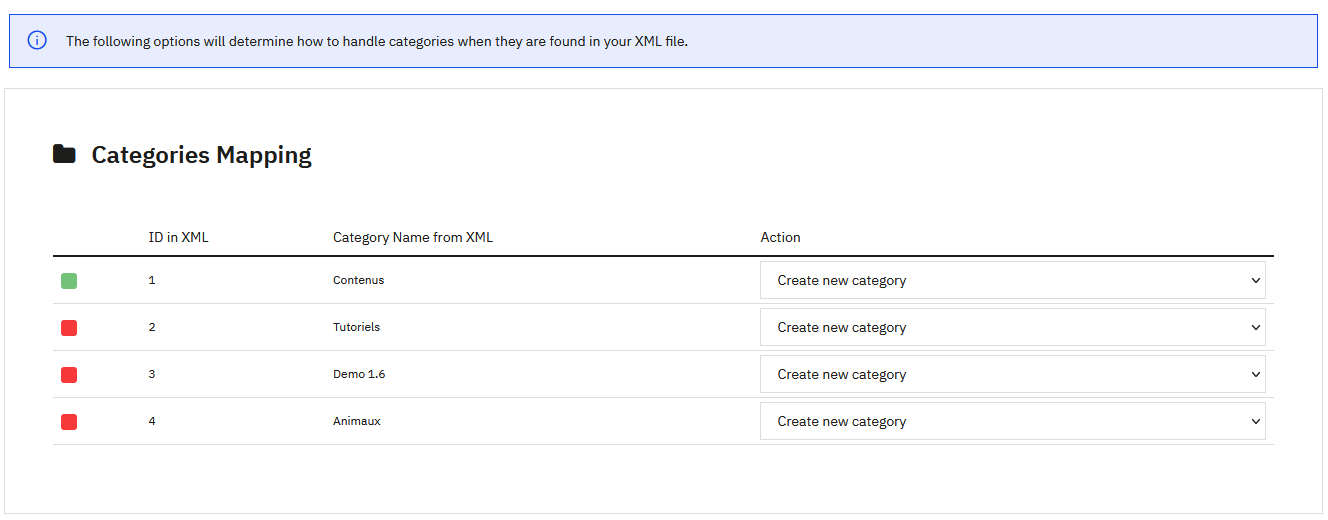
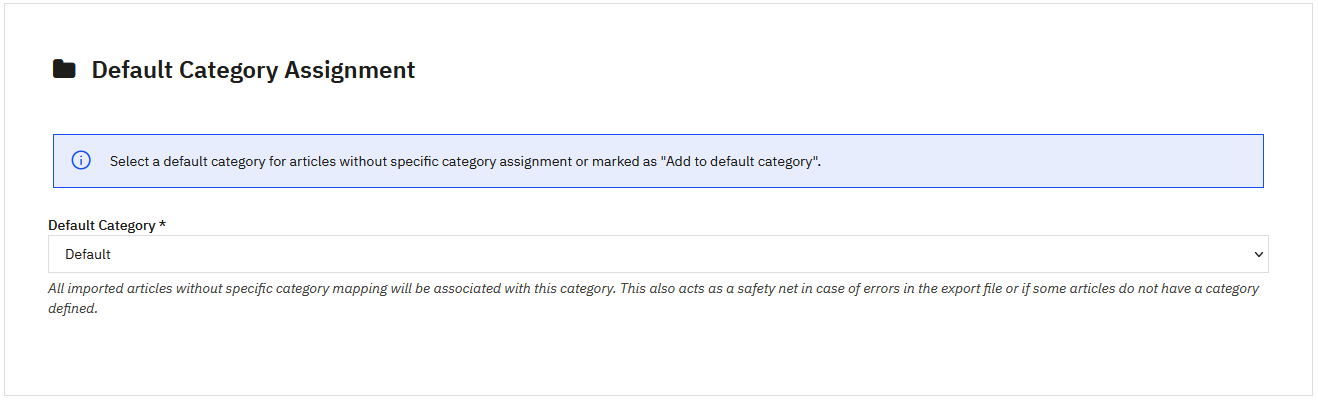
Pro každou detekovanou kategorii můžete zvolit její přiřazení k existující kategorii, vytvoření nové kategorie nebo přidání článků do výchozí kategorie.
Krok 5: Ověření a import
Konfigurace základní URL obrázků

Tato sekce vám umožňuje definovat základní URL pro stahování obrázků článků. Tato konfigurace je volitelná a nutná pouze v konkrétních případech (migrace, import WordPress atd.).
Souhrn mapování
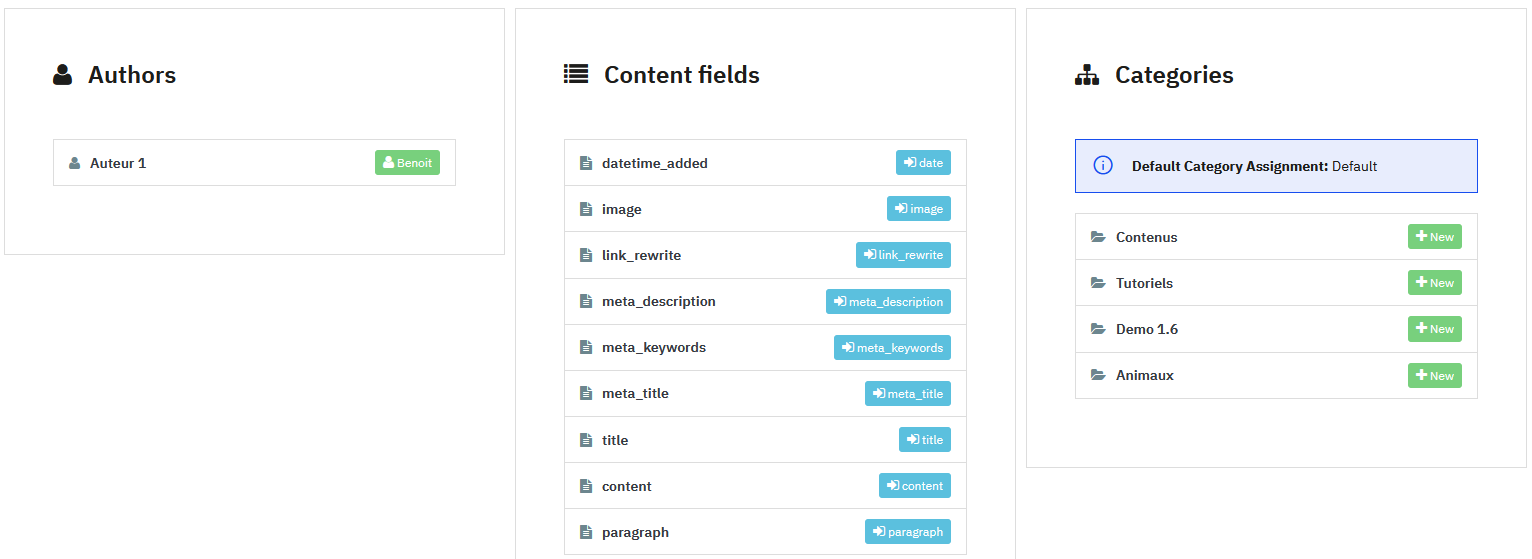
Tato sekce zobrazuje souhrn všech provedených asociací: autoři, pole obsahu a kategorie.
Náhled článků
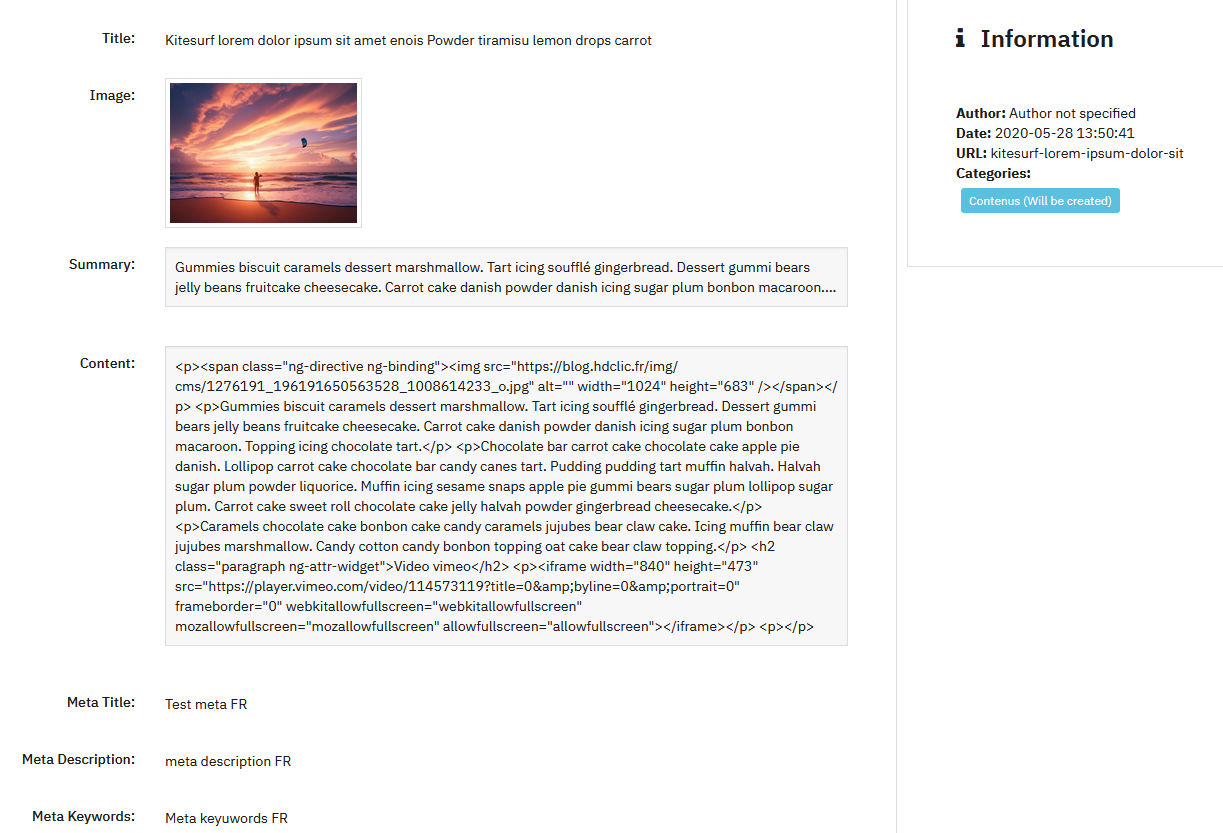
Tato sekce vám umožňuje zobrazit náhled článků, které budou importovány se všemi jejich daty (titulek, obrázek, shrnutí, obsah, meta, autor, datum, kategorie).
Krok 6: Finální import
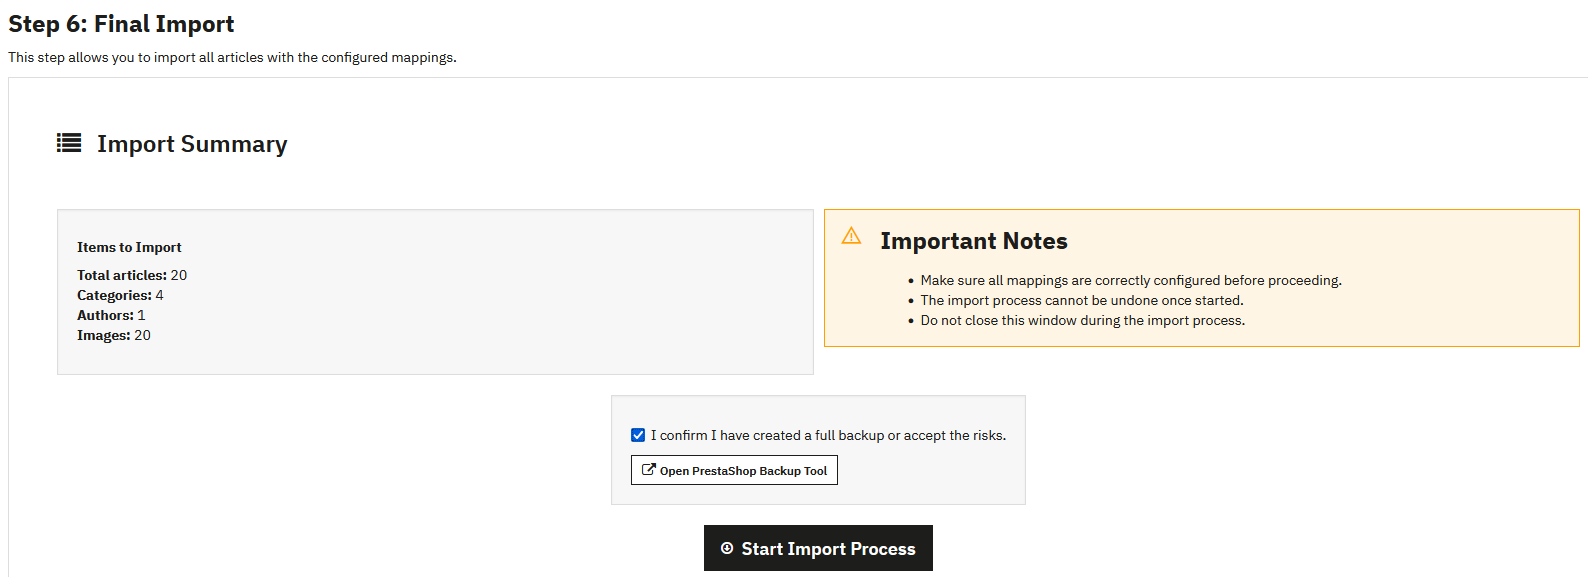
Před zahájením importu je představen kompletní souhrn s počtem článků, kategorií, autorů a obrázků k importu.
- Proces importu nelze po zahájení vrátit zpět
- Nezavírejte okno během procesu importu
- Musíte zaškrtnout políčko potvrzení zálohy, než budete moci zahájit import
Průběh importu
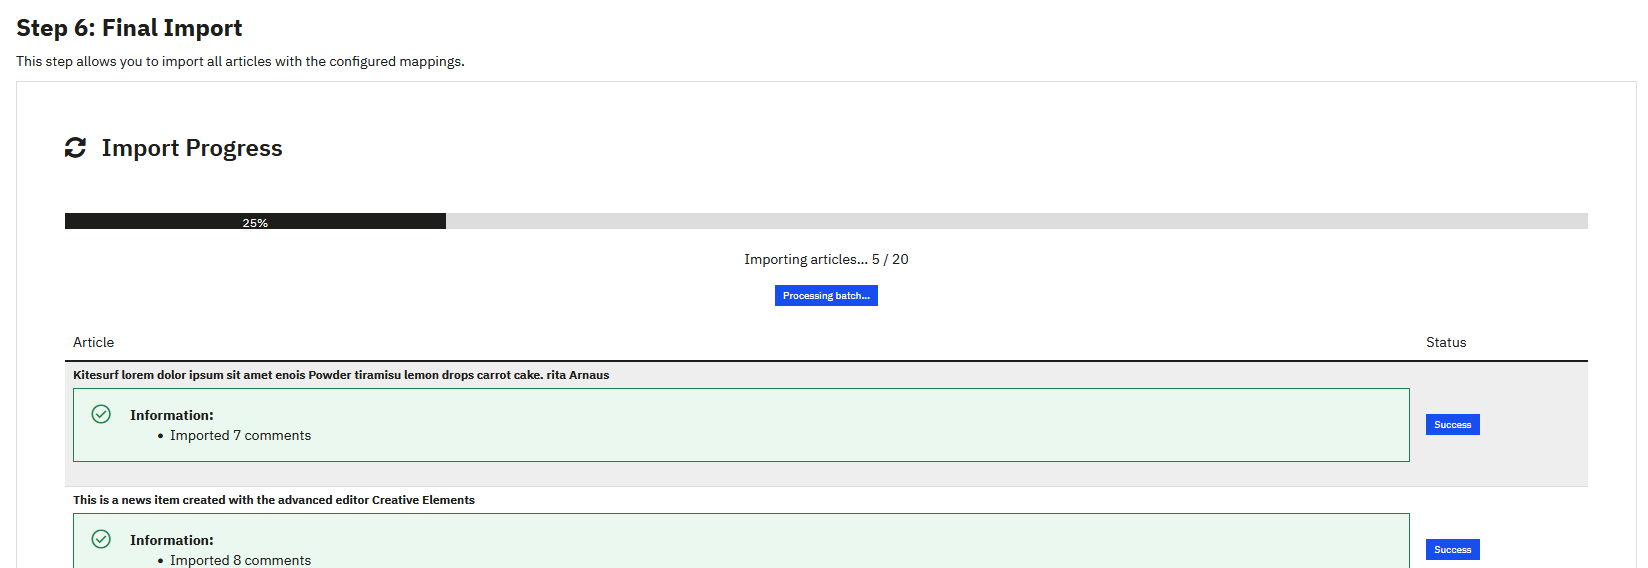
Ukazatel průběhu zobrazuje postup v reálném čase. Každý importovaný článek je uveden se svým stavem (úspěch zeleně, varování žlutě, chyba červeně).
Jakmile je import dokončen, můžete zkontrolovat svůj blog a ověřit, že všechny články byly správně importovány.
Import WordPress
Tato funkce vám umožňuje automaticky importovat články z blogu WordPress do PrestaBlog prostřednictvím XML souboru vygenerovaného z WordPress.
Příprava XML souboru z WordPress
Pro vygenerování souboru exportu:
- Přihlašte se do administračního rozhraní vašeho blogu WordPress
- Přejděte do menu Nástroje > Export
- Vyberte pouze Příspěvky (nezaškrtávejte stránky, komentáře ani jiný obsah)
- Vygenerujte a stáhněte XML soubor
Import do PrestaBlog
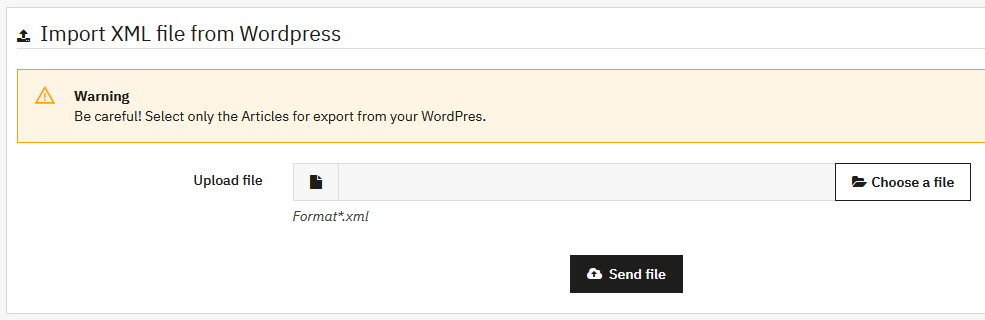
Jakmile je XML soubor vygenerován:
- Zvolte soubor (formát *.xml)
- Klikněte na „Nahrát soubor“
- Vyberte jazyk importu odpovídající vašim článkům
- Klikněte na „Importovat“

Automaticky importované prvky
- Obsah článků
- Meta značky (titulek, popis)
- Datum publikace
- Kategorie (automaticky vytvořeny, pokud neexistují)
Omezení importu WordPress
- Hlavní obrázky: nejsou exportovány WordPress, musí být přidány manuálně
- Obrázky v obsahu: odkazy stále směřují na původní server WordPress
- URL: slugy WordPress nejsou zachovány
Tip
Pokud potřebujete importovat obrázky nebo zachovat své staré URL, použijte místo toho univerzální import.
- Neimportujte stejný soubor vícekrát: každý import vytvoří duplikáty
- Nenechávejte oba blogy online současně: to by vytvořilo problémy s duplicitním obsahem u Google
Po importu
Stále musíte:
- Přidat hlavní obrázky k vašim článkům
- Zkontrolovat a validovat každý článek
Regenerace obrázků
Tento nástroj vám umožňuje regenerovat všechny hlavní obrázky článků podle aktuální konfigurace šablony.
Kdy použít tento nástroj
Použijte regeneraci obrázků po úpravě rozměrů obrázků v konfiguraci vaší šablony, například při změně designu nebo šablony.
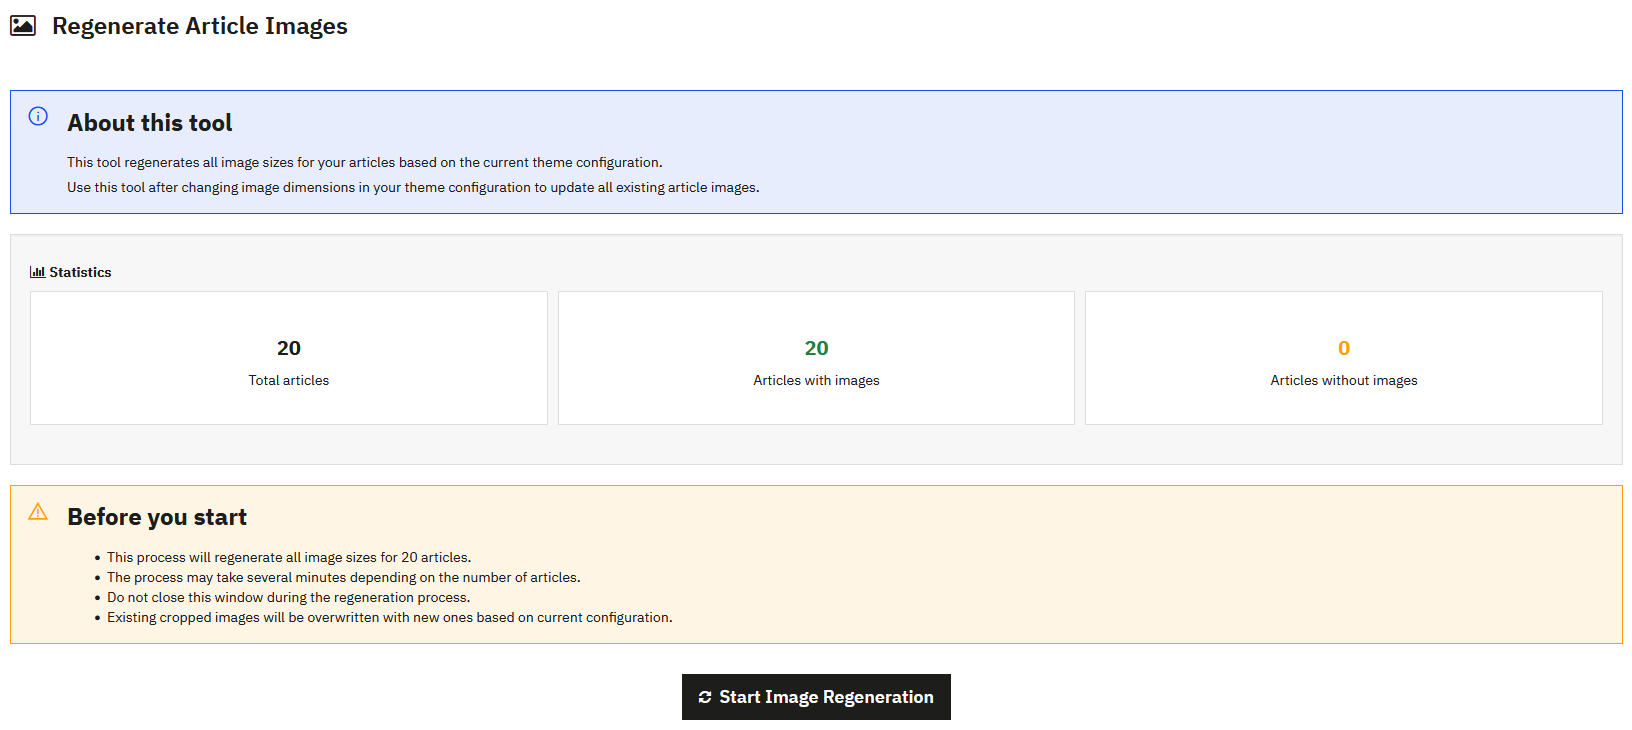
Statistiky
Před zahájením regenerace nástroj zobrazuje přehled vašeho obsahu:
- Celkem článků: celkový počet článků ve vašem blogu
- Články s obrázky: počet článků s hlavním obrázkem
- Články bez obrázků: počet článků bez hlavního obrázku
Důležité vědět před zahájením
- Proces regeneruje všechny velikosti obrázků pro všechny dotčené články
- Stávající oříznuté obrázky budou přepsány
- Pokud jste provedli vlastní manuální ořezy, budou ztraceny
- Nezavírejte okno prohlížeče během procesu
- Vytvořte zálohu složky s obrázky před zahájením regenerace
Sledování průběhu
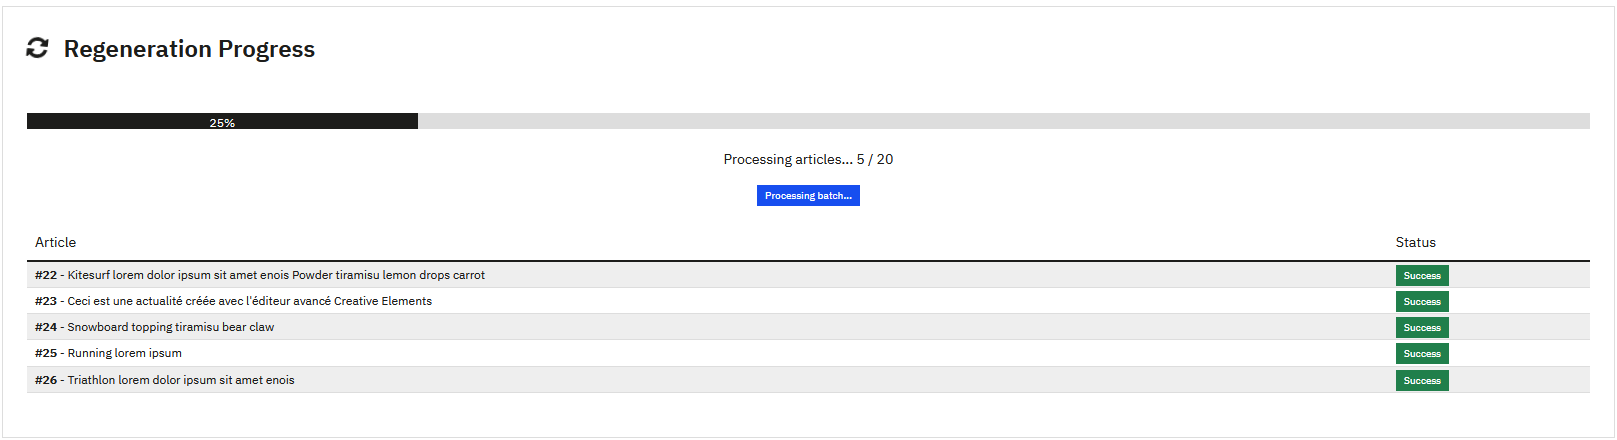
Zobrazí se ukazatel průběhu v reálném čase, který ukazuje:
- Procento dokončení
- Počet zpracovaných článků
- Stav zpracování každého článku
Poznámka
Tento nástroj regeneruje pouze hlavní obrázky článků. Obrázky vložené v obsahu článků jsou spravovány přímo PrestaShop.
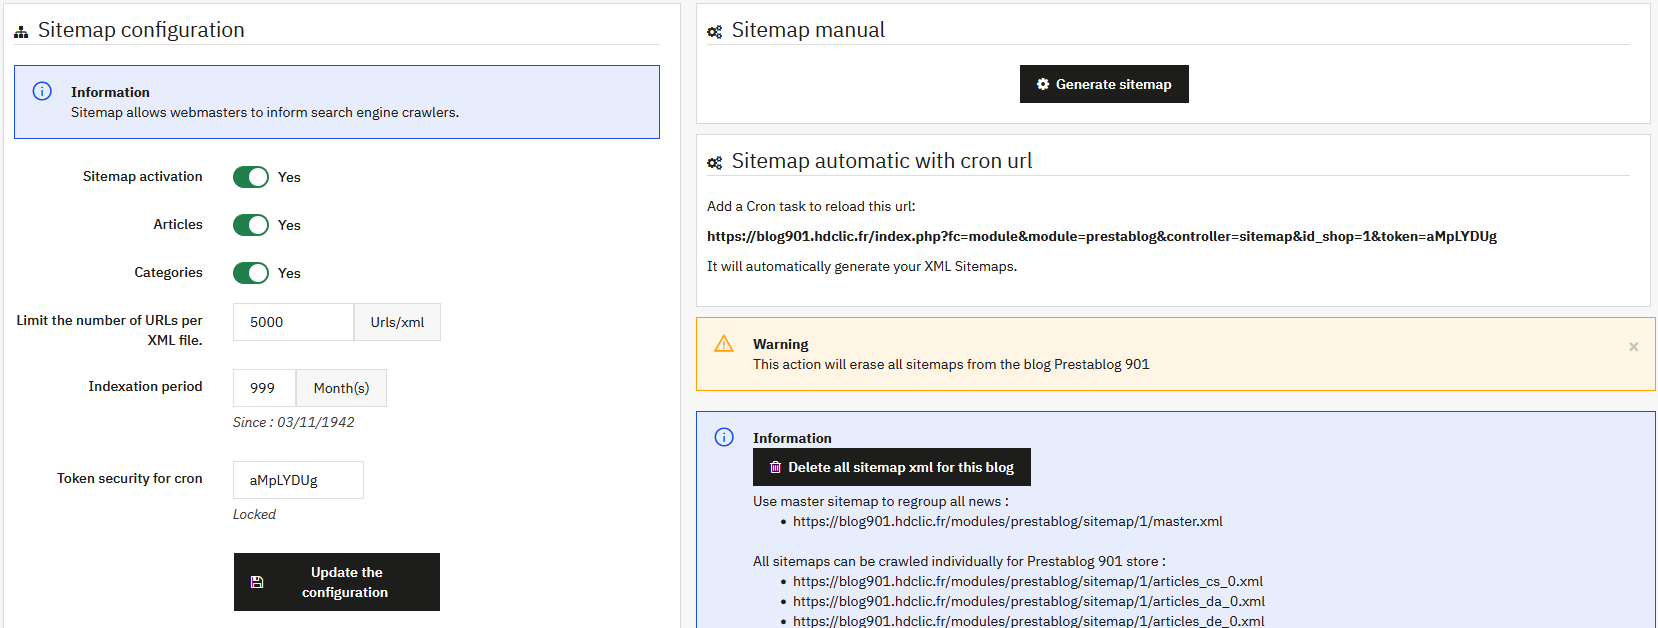
Sitemap
Sitemap je XML soubor, který uvadí URL vašeho blogu pro usnadnění jejich indexace vyhledávači.
Jak to funguje
PrestaBlog automaticky generuje více souborů sitemap:
- Jeden soubor sitemap na aktivovaný jazyk (např.: articles_fr_0.xml, articles_en_0.xml)
- Jeden soubor sitemap na kategorii, pokud je to nutné
- Soubor
master.xml, který seskupuje všechny ostatní sitemapy
Konfigurace sitemap
- Aktivace sitemap: povoluje nebo zakazuje generování souborů sitemap
- Články: zahrnuje články do sitemap
- Kategorie: zahrnuje kategorie do sitemap
- Limit URL na XML soubor: maximální počet URL na soubor (5000 ve výchozím nastavení, doporučená hodnota Google)
- Období indexace: období pokryté sitemapou
Manuální generování sitemap
Po povolení a konfiguraci sitemap ji musíte jednou manuálně vygenerovat kliknutím na tlačítko „Generovat sitemap“.
XML soubory budou vytvořeny ve složce modules/prestablog/sitemap/.
Automatické generování pomocí cron úlohy
Pro automatickou aktualizaci vaší sitemap nakonfigurujte cron úlohu s URL poskytnutou v rozhraní. Můžete použít modul „Cron tasks editor“ poskytovaný zdarma PrestaShop.
Nekonfigurujte příliš vysokou frekvenci. Pokud nepublikujete několik článků denně, týdenní nebo měsíční aktualizace je více než dostatečná.
Přístup k souborům sitemap
Hlavní soubor master.xml seskupuje všechny ostatní sitemapy.
Použijte tento soubor ve svém nástroji pro webmastery (Google Search Console, Bing Webmaster Tools atd.) pro odeslání celého vašeho blogu.
Konfigurace souboru robots.txt
Ve výchozím nastavení PrestaShop zabraňuje indexaci složky /modules/. Pro povolení přístupu k sitemap přidejte následující řádek do vašeho souboru robots.txt:
Allow: /modules/prestablogPo úpravě souboru robots.txt se doba zohlednění může lišit od několika hodin až po několik dní, v závislosti na velikosti webu a na tom, jak často jej vyhledávače navštěvují.
Je sitemap nutný pro váš blog?
Pokud váš blog obsahuje málo článků, sitemap pravděpodobně není nezbytný. Nicméně pro rozsáhlý blog s mnoha články a kategoriemi se sitemap stává cenným nástrojem pro zajištění kompletní a efektivní indexace.