Tools
PrestaBlog offers several tools to facilitate your blog management and improve your productivity. These tools are accessible via the module's "Tools" menu.
Artificial Intelligence (ChatGPT)
PrestaBlog integrates a writing assistance feature based on ChatGPT, developed by OpenAI. This integration allows you to generate article ideas, write content or create summaries directly from the article editing interface.
To use this feature, you need an OpenAI account and a valid API key.
How to Get a ChatGPT API Key
To get your API key, follow these steps:
- Click here and create or log in to your OpenAI account
- Generate a new API key or copy your existing API key.
- Save your API key securely.
- Choose the type of GPT you want to use. We suggest starting with the GPT-4 option.
For more detailed instructions, visit the OpenAI website.
ChatGPT API Configuration
ChatGPT API Key
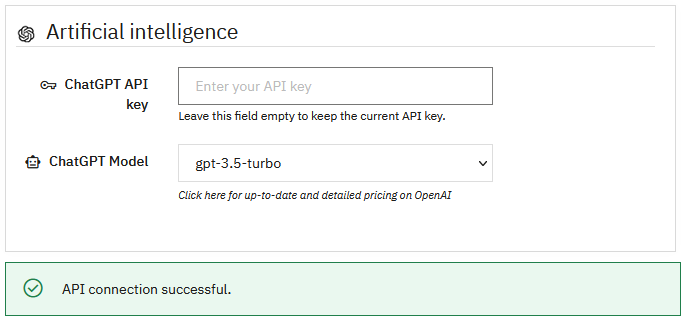
Enter your OpenAI API key in the provided field. Once saved, the key will no longer be visible in the interface for security reasons: the field will remain empty even if your key is properly saved.
If you want to modify or replace your API key, you can enter a new key in this field.
Leave the field empty if you want to keep the current API key and just change the model used.
ChatGPT Model
Select the ChatGPT model you want to use to generate content. Each model has different characteristics in terms of performance and usage costs.
OpenAI Pricing
To view detailed and up-to-date pricing for different models, consult the official OpenAI documentation.
Configuration Validation
Once your API key and chosen model are set, click the "Update" button to save your configuration. If your API key is valid and the connection to the OpenAI API is successful, a green confirmation message "API connection successful." will appear at the bottom of the interface.
Using ChatGPT in PrestaBlog
Once configuration is complete, the ChatGPT integration becomes available when creating or editing an article. The assistance interface consists of three main areas:
- AI Conversation Interface: displays the current conversation with ChatGPT and indicates available actions
- Select discussion type: choose the goal of your interaction (idea generation, article writing, summary creation, etc.)
- Input area: enter your messages or requests based on the selected discussion type
See the section on using AI in PrestaBlog for more details.
Anti-spam
PrestaBlog integrates an anti-spam system based on custom questions. This system provides an effective and free alternative to traditional anti-spam solutions.
The principle is simple: to post a comment, visitors must correctly answer a randomly chosen question from those you have created. This fun and customizable mechanism effectively blocks spam bots while remaining accessible to your human readers.
Note
This system only works with PrestaBlog's classic comments.
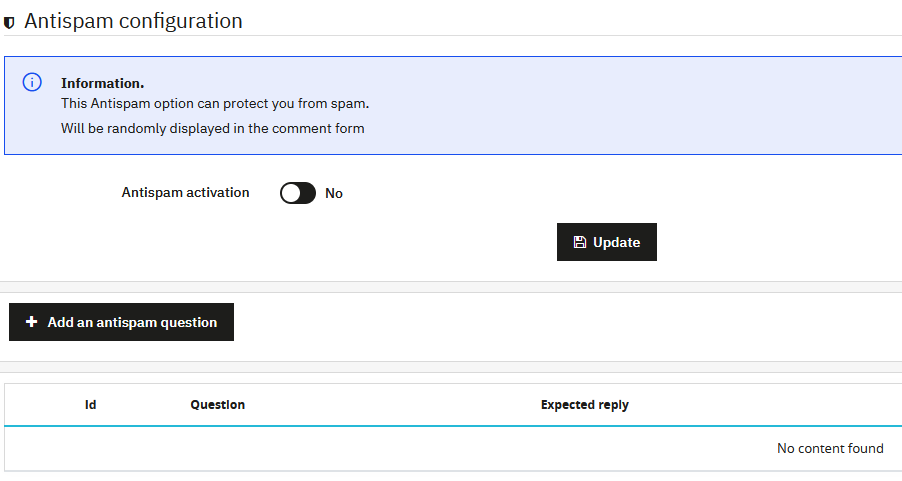
Anti-spam Activation
The "Enable antispam" switch allows you to globally enable or disable the question-based anti-spam system. When disabled, no questions will be asked to visitors and they can comment freely.
Anti-spam Question Management
A summary table displays all the anti-spam questions you have created. For each question, you can view:
- The identifier (Id)
- The question asked
- The expected answer
From this table, you can modify or delete existing questions, as well as enable or disable each question individually without permanently deleting it.
Adding an Anti-spam Question
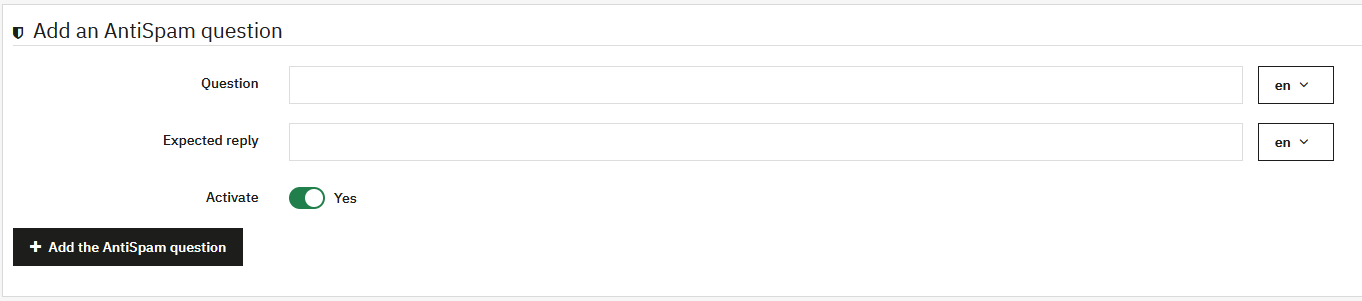
The "Add an antispam question" button allows you to create a new question. The creation form offers the following fields:
- Question: the question that will be asked to visitors (multilingual)
- Expected answer: the exact answer visitors must provide (multilingual)
- Enable: allows you to enable or disable the question
Usage Tips
For optimal effectiveness, it is recommended to create multiple anti-spam questions. The more varied questions you create, the harder it will be for spam bots to bypass your protection system.
Question Examples
Favor simple questions for your human readers, but difficult to guess for a robot:
- "What color is the sky?" (answer: "blue")
- "How much is 2 + 2?" (answer: "4")
- Questions related to your blog's theme
XML Export
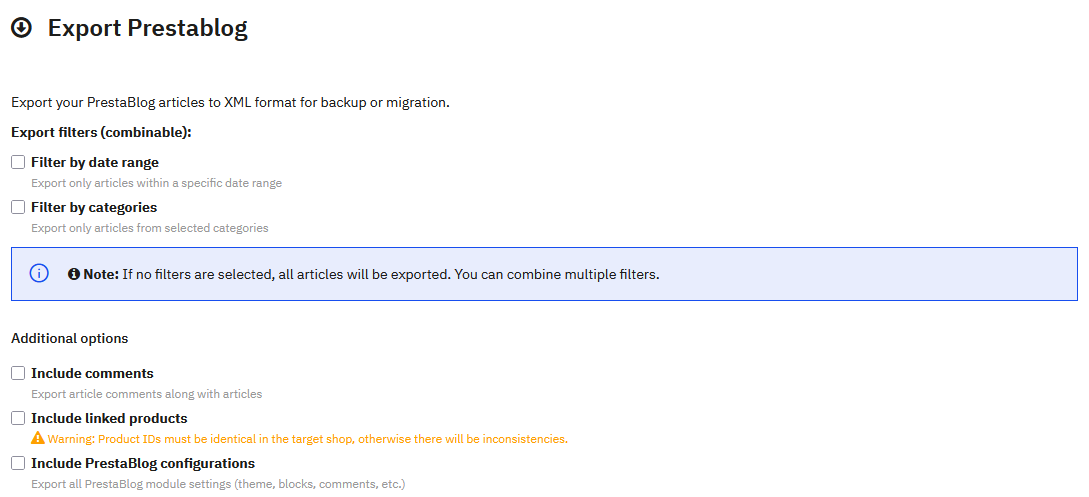
PrestaBlog allows you to export all your content in XML format to back them up or migrate them to another PrestaShop installation. This feature generates an XML file compatible with PrestaBlog's universal import wizard.
Export Filters
You can refine your export using one or more combinable filters. If no filter is selected, all articles will be exported.
Filter by date range
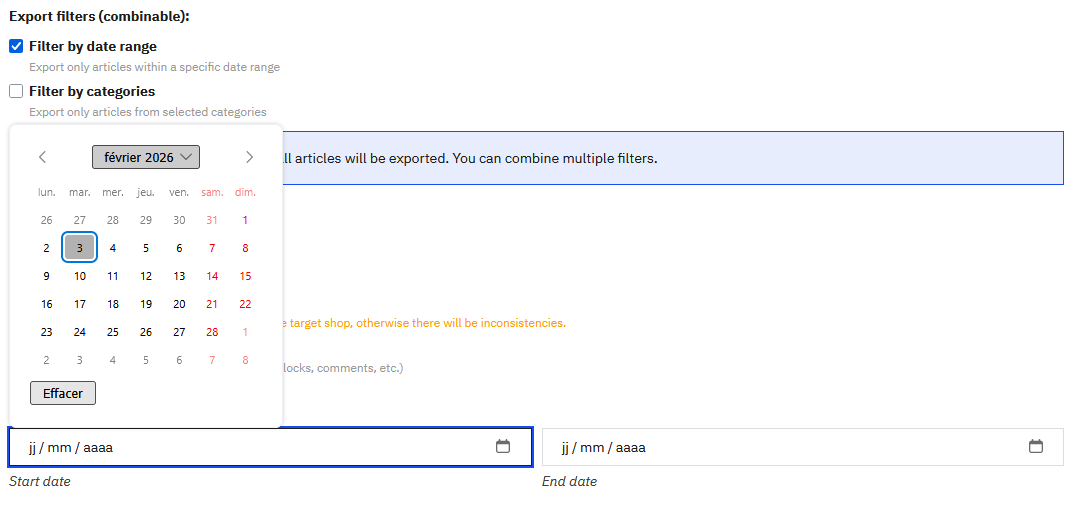
This option allows you to export only articles published within a specific period. An interactive calendar allows you to easily select start and end dates.
Filter by categories
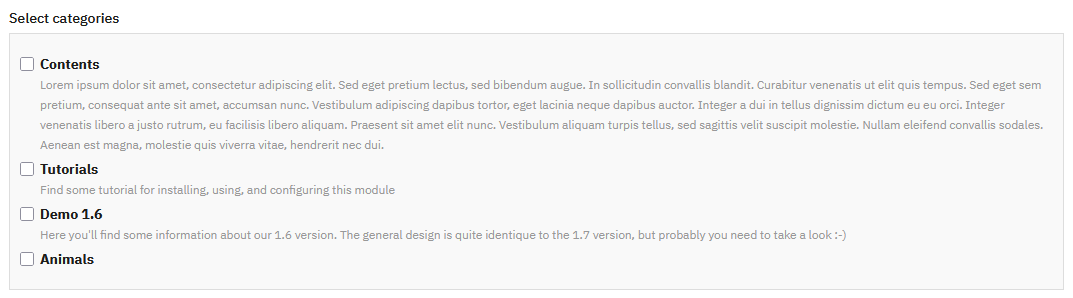
This option allows you to export only articles belonging to certain categories. Two buttons facilitate selection: "Select all" and "Deselect all".
Additional Options
Three options allow you to enrich the content of your export:
- Include comments: enables export of comments associated with articles
- Include related products: enables export of associations between articles and PrestaShop products
- Include PrestaBlog configurations: enables export of all module configuration settings
Exported Content
Depending on selected options, the XML file may contain:
- All article content and metadata
- Categories and their hierarchical structure
- Author associations
- Multilingual content
- Main image of each article
- Comments (if option is checked)
- Associated products (if option is checked)
- Module configurations (if option is checked)
Generate Export
Once your filters and options are configured, click the "Export PrestaBlog" button. The XML file will be generated and automatically downloaded to your computer.
Universal Import
PrestaBlog's universal import allows you to import articles from any properly structured XML file. This feature has two main uses:
- Import a PrestaBlog export file: the process is largely automated
- Import articles from other blog platforms: the system guides you step by step
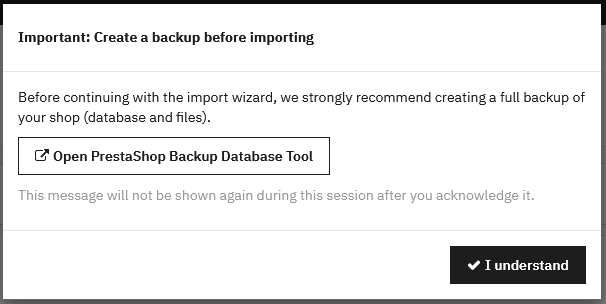
Before starting an import, it is strongly recommended to create a complete backup of your store (database and files).
Prior Author Creation
If your XML file contains articles associated with authors, you must create these authors in PrestaBlog BEFORE starting the import. If authors are not created beforehand, articles will not be associated with their original authors.
Step 1: File Selection
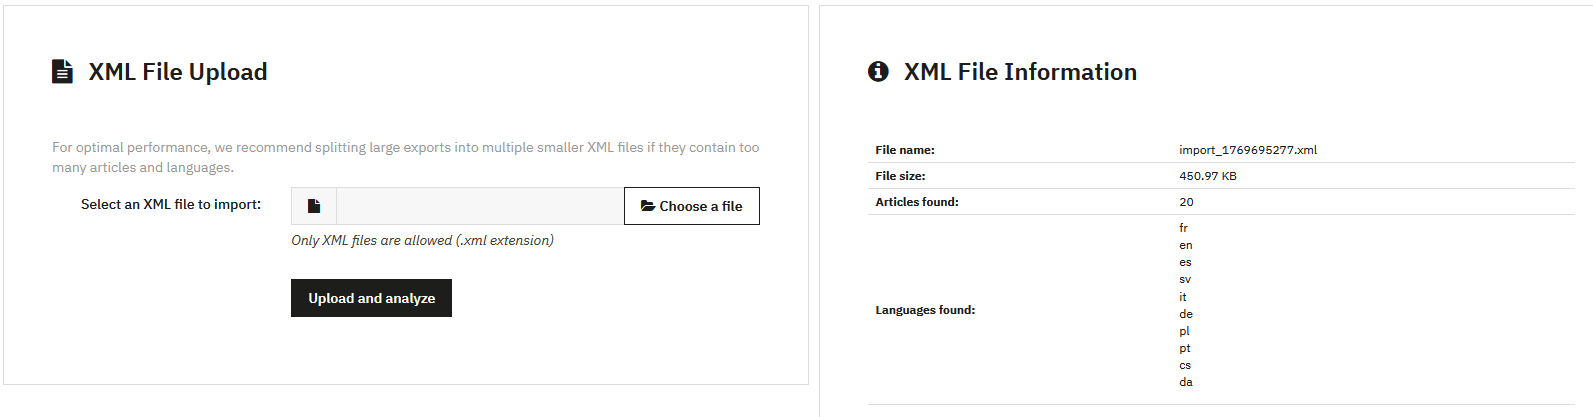
The first step is to upload your XML file. Only .xml format files are accepted.
Once the file is uploaded and analyzed, a summary displays with the file name, size, number of articles found and detected languages.
Step 2: Language Management
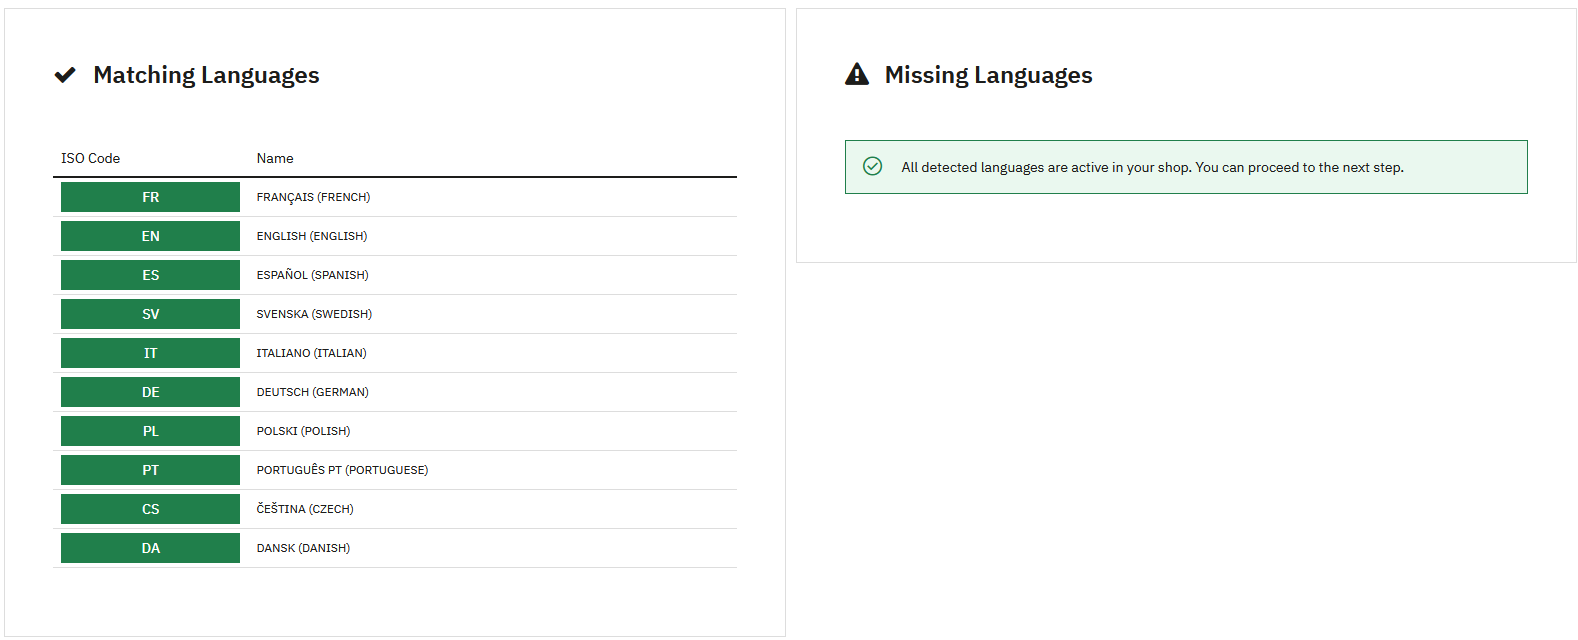
This step manages the correspondence between languages present in your XML file and active languages in your PrestaShop store.
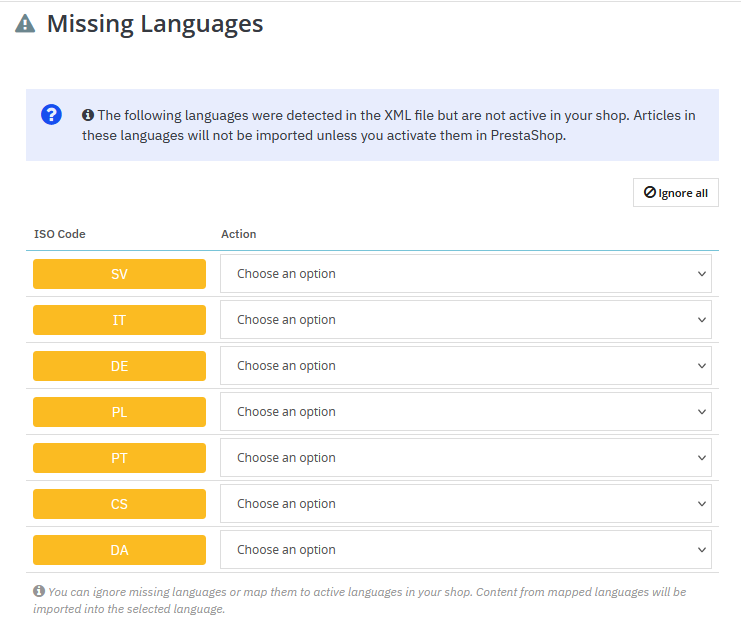
If some languages present in the XML file are not activated in your store, you must choose an action for each language: ignore the content or associate it with an existing language.
Step 3: Author Management
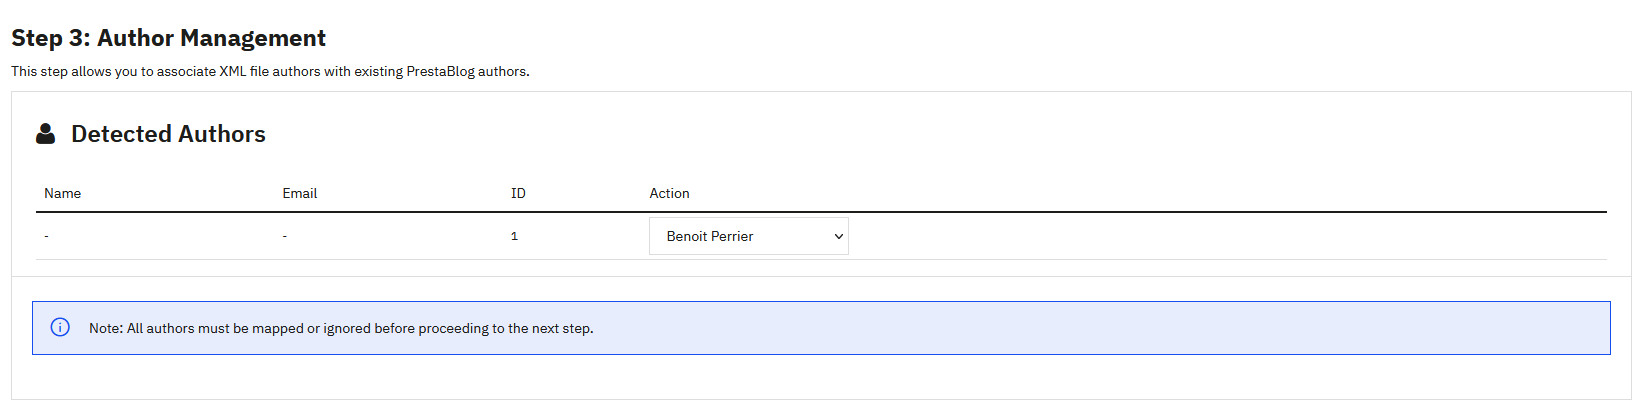
This step allows you to associate authors from the XML file with existing PrestaBlog authors. If you created authors beforehand with the same IDs, the association is automatic.
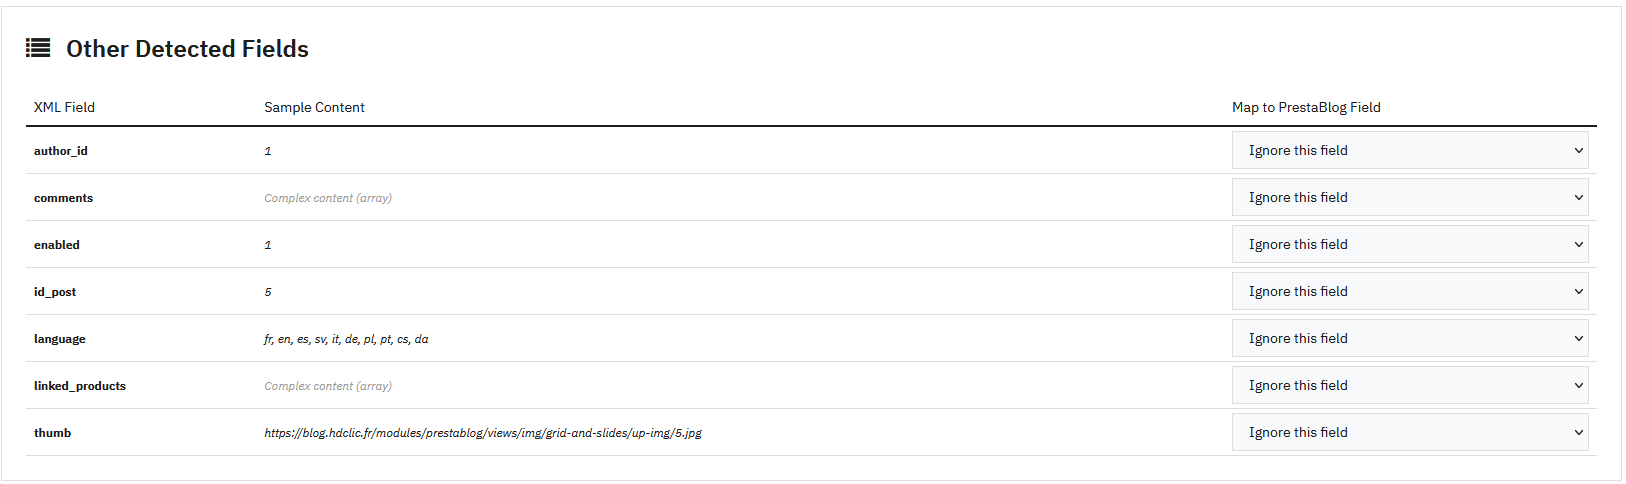
Step 4: Field Mapping
This step is the most complex in the import wizard. It maps fields from the XML file to PrestaBlog fields. For a PrestaBlog export file, this mapping is automatic.
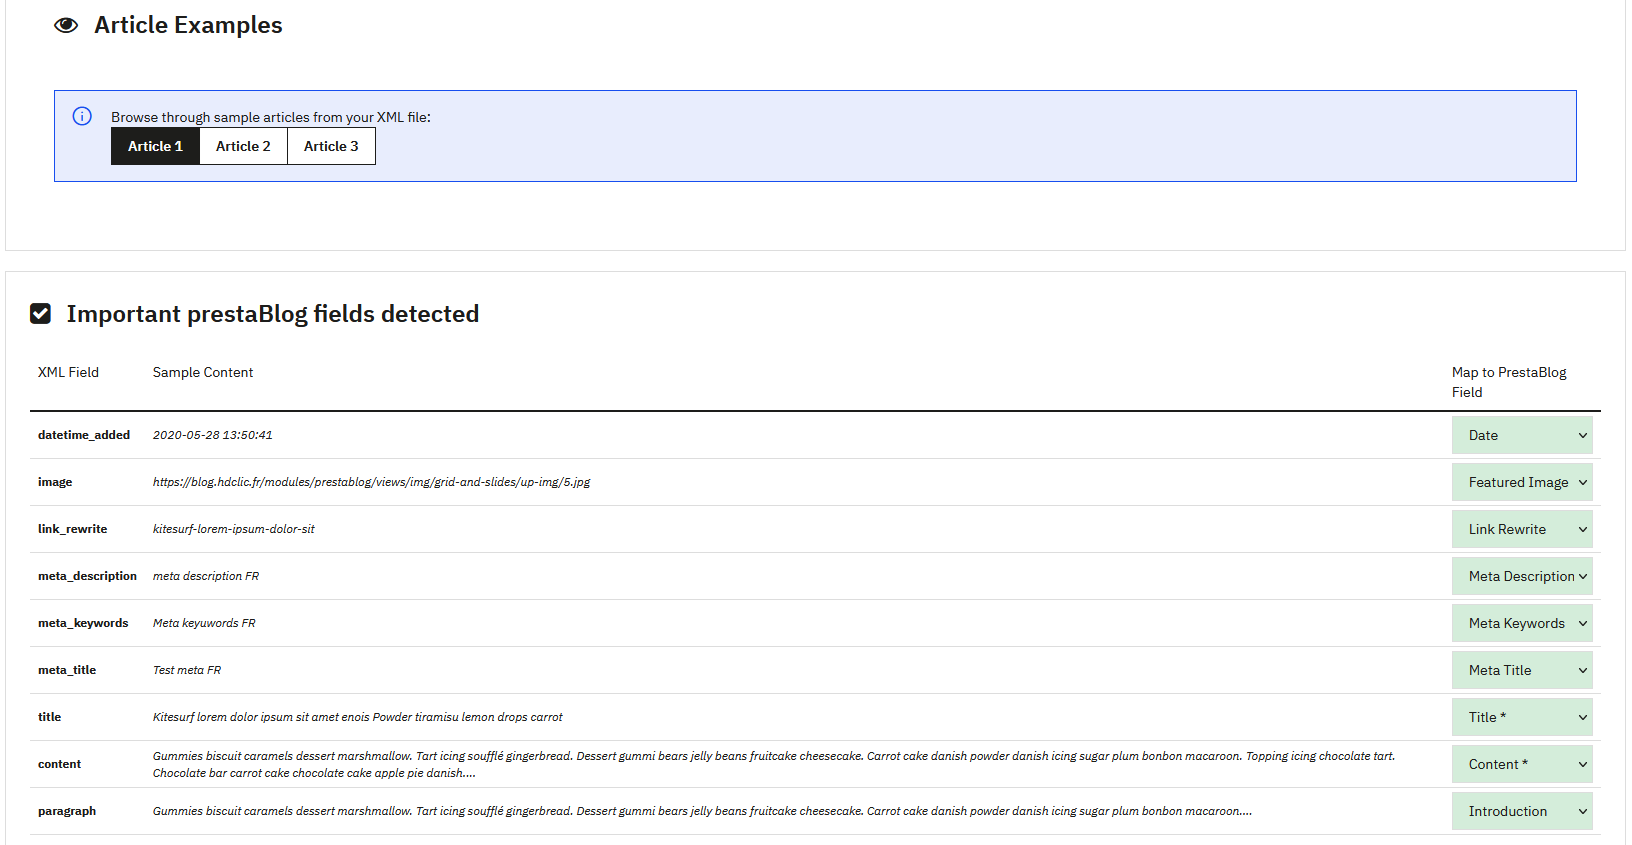
An area displaying article examples allows you to preview content before import.
Article ID Management

The "Force article ID preservation" option allows you to keep original IDs during import. This option is useful for preserving SEO and external links.
Category Mapping
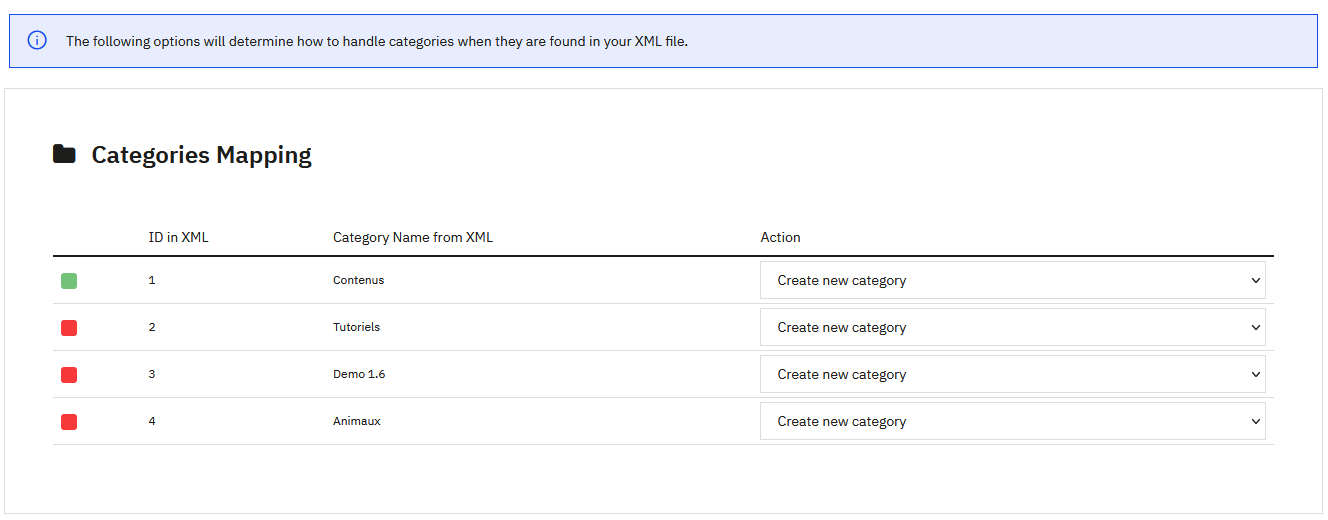
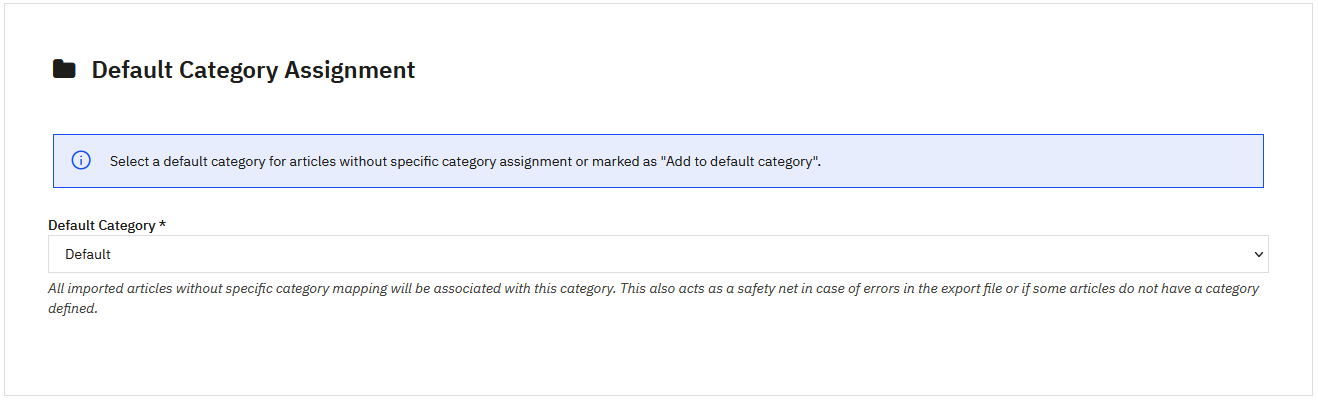
For each detected category, you can choose to associate it with an existing category, create a new category, or add articles to the default category.
Step 5: Verification and Import
Image Base URL Configuration

This section allows you to define a base URL for downloading article images. This configuration is optional and only necessary in specific cases (migration, WordPress import, etc.).
Mapping Summary
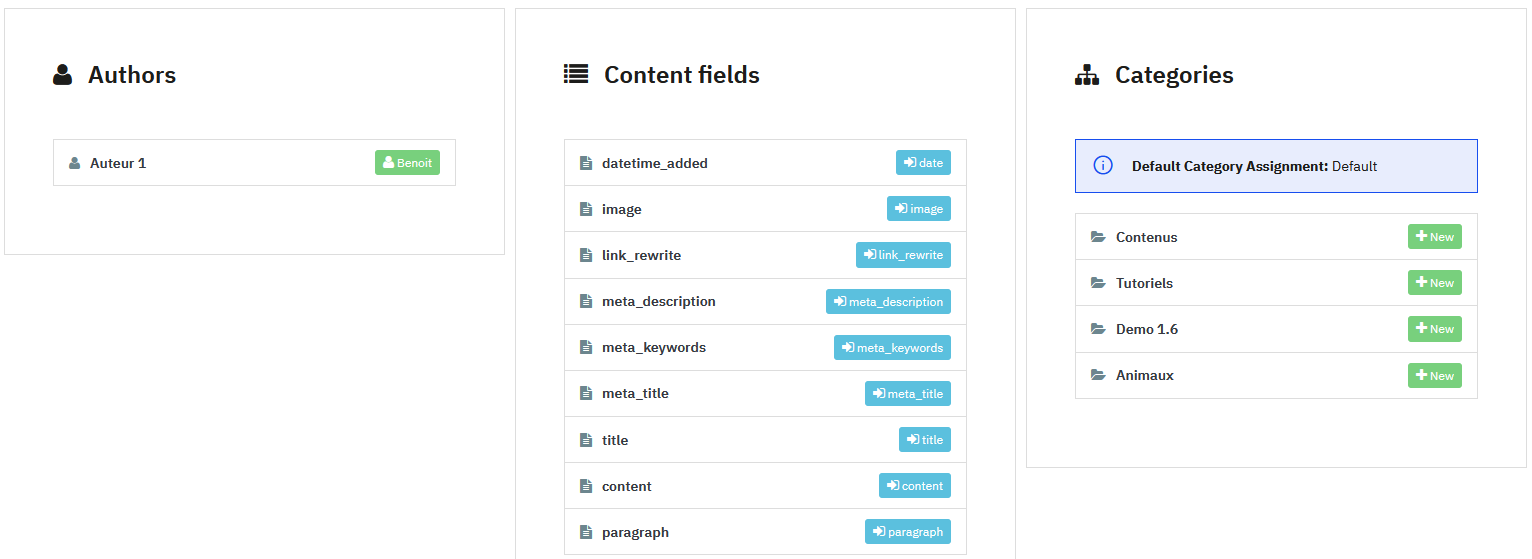
This section displays a summary of all associations made: authors, content fields and categories.
Article Preview
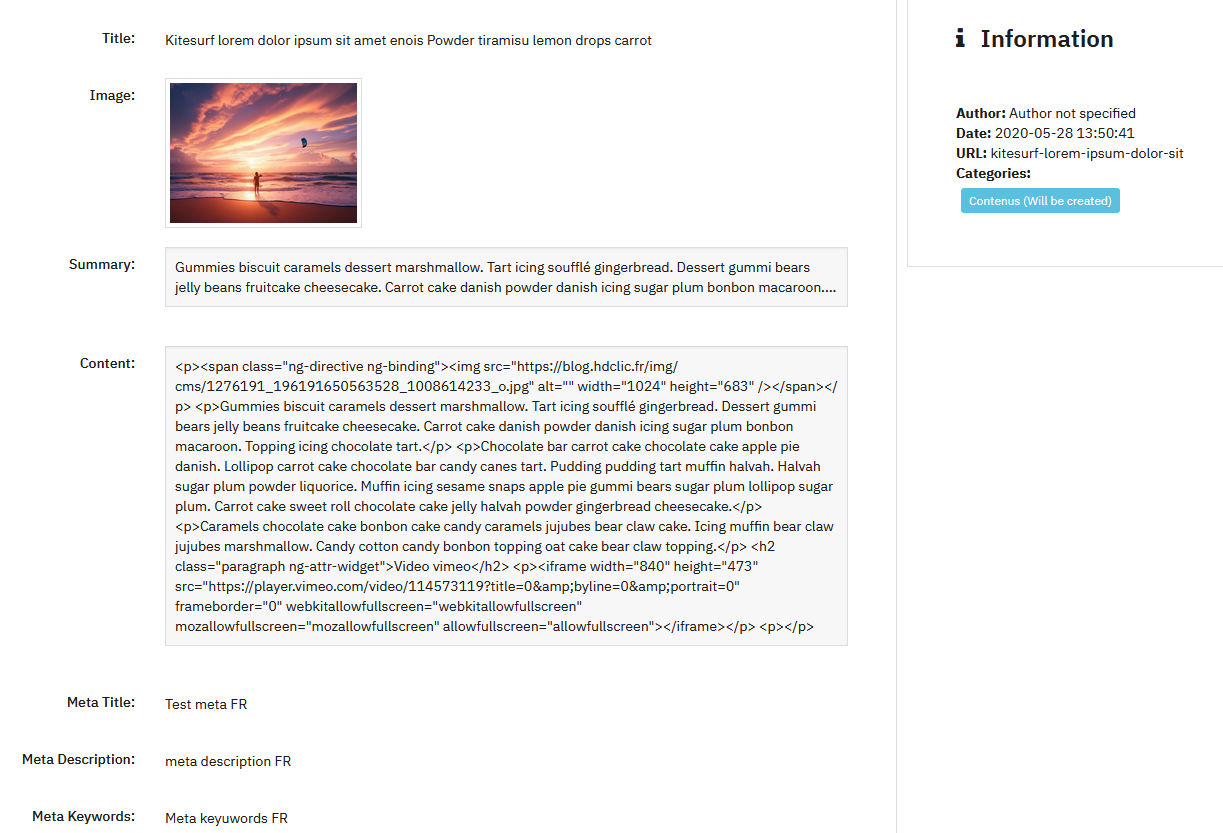
This section allows you to preview articles that will be imported with all their data (title, image, summary, content, metas, author, date, categories).
Step 6: Final Import
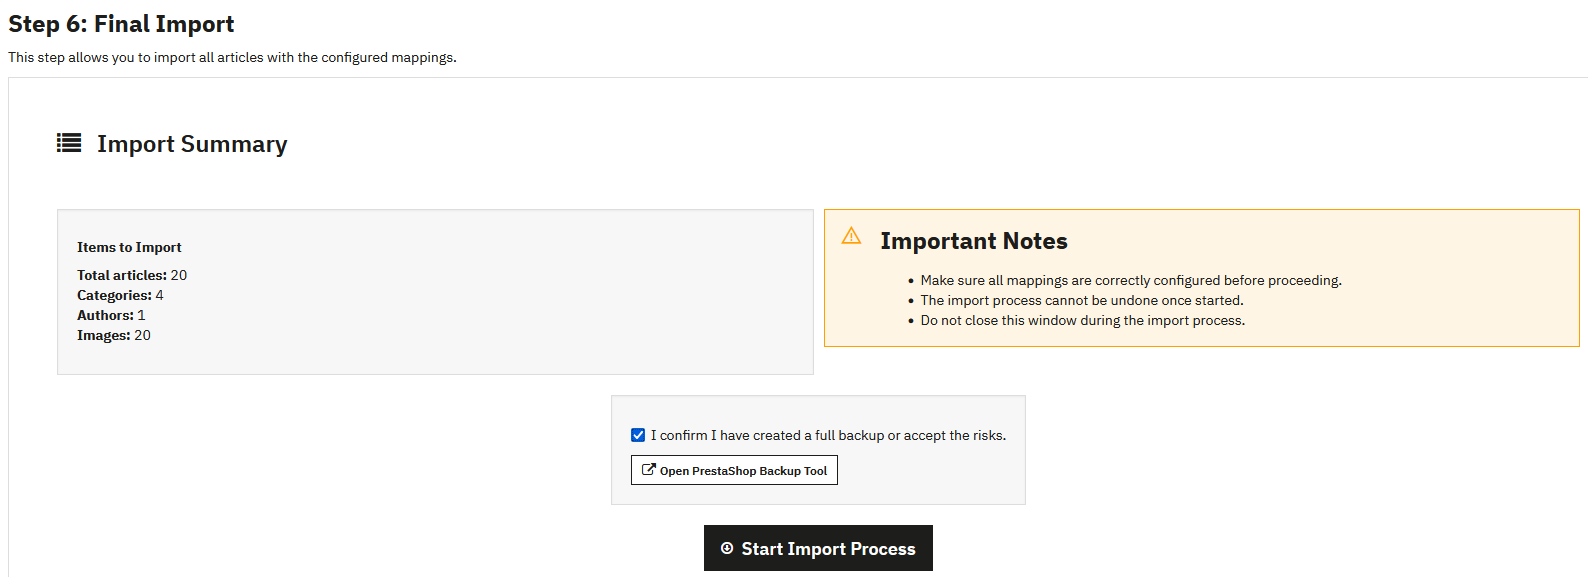
Before starting the import, a complete summary is presented with the number of articles, categories, authors and images to import.
- The import process cannot be undone once started
- Do not close the window during the import process
- You must check the backup confirmation box before you can start the import
Import Progress
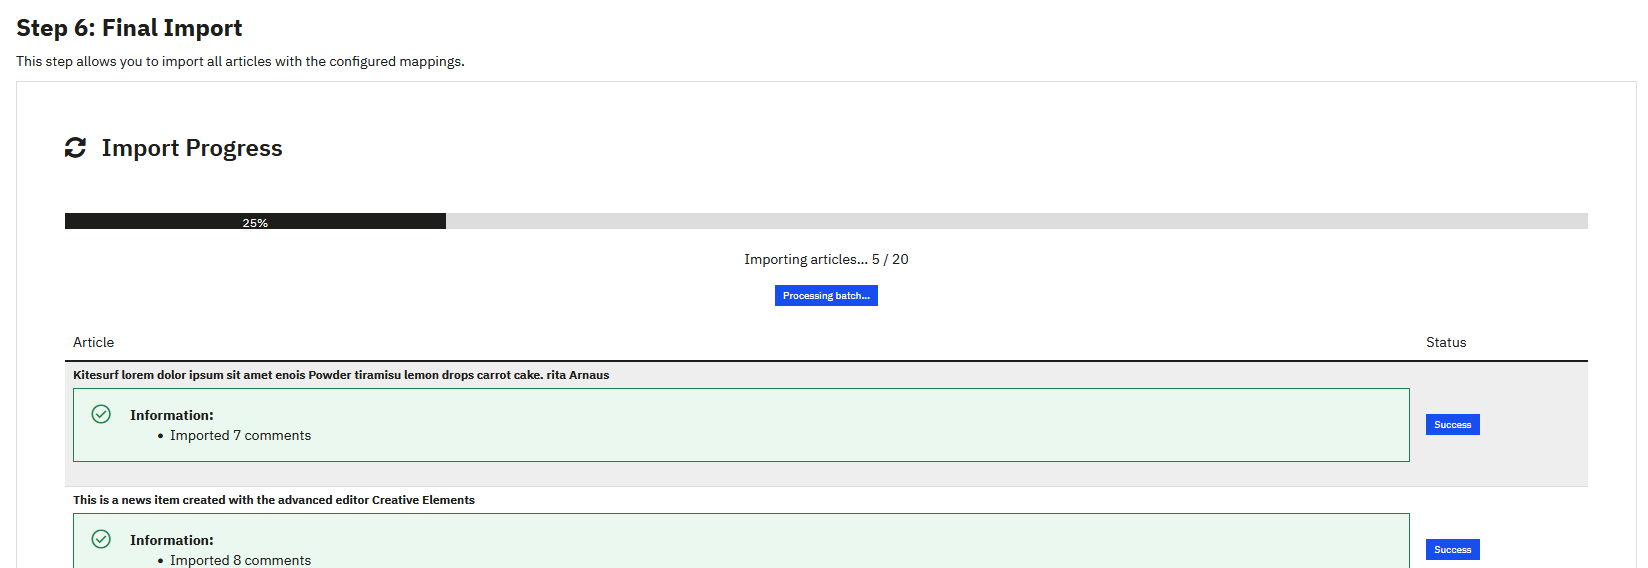
A progress bar indicates real-time progress. Each imported article is listed with its status (success in green, warning in yellow, error in red).
Once the import is complete, you can check your blog to verify that all articles have been correctly imported.
WordPress Import
This function allows you to automatically import articles from a WordPress blog to PrestaBlog via an XML file generated from WordPress.
Preparing the XML File from WordPress
To generate the export file:
- Log in to your WordPress blog administration interface
- Go to the Tools > Export menu
- Select only Posts (do not check pages, comments or other content)
- Generate and download the XML file
Importing into PrestaBlog
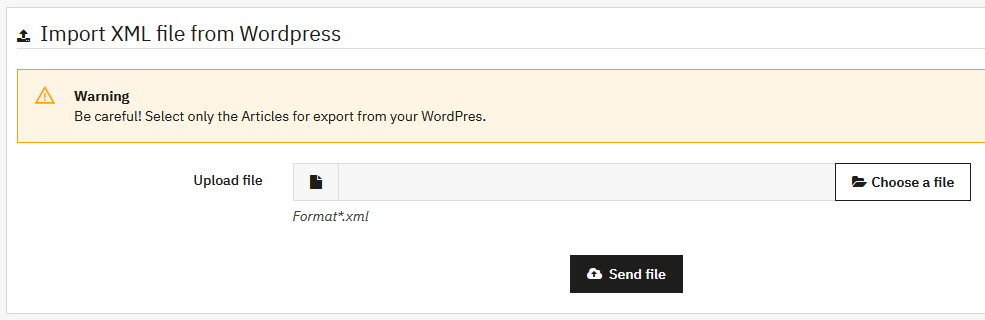
Once the XML file is generated:
- Choose a file (*.xml format)
- Click "Upload file"
- Select the import language corresponding to your articles
- Click "Import"

Automatically Imported Elements
- Article content
- Meta tags (title, description)
- Publication date
- Categories (automatically created if they don't exist)
WordPress Import Limitations
- Featured images: not exported by WordPress, must be added manually
- Content images: links still point to the original WordPress server
- URLs: WordPress slugs are not preserved
Tip
If you need to import images or preserve your old URLs, use the universal import instead.
- Do not import the same file multiple times: each import will create duplicates
- Do not leave both blogs online simultaneously: this would create duplicate content issues with Google
After Import
You still need to:
- Add featured images to your articles
- Review and validate each article
Image Regeneration
This tool allows you to regenerate all article featured images according to the current theme configuration.
When to Use This Tool
Use image regeneration after modifying image dimensions in your theme configuration, for example during a design or template change.
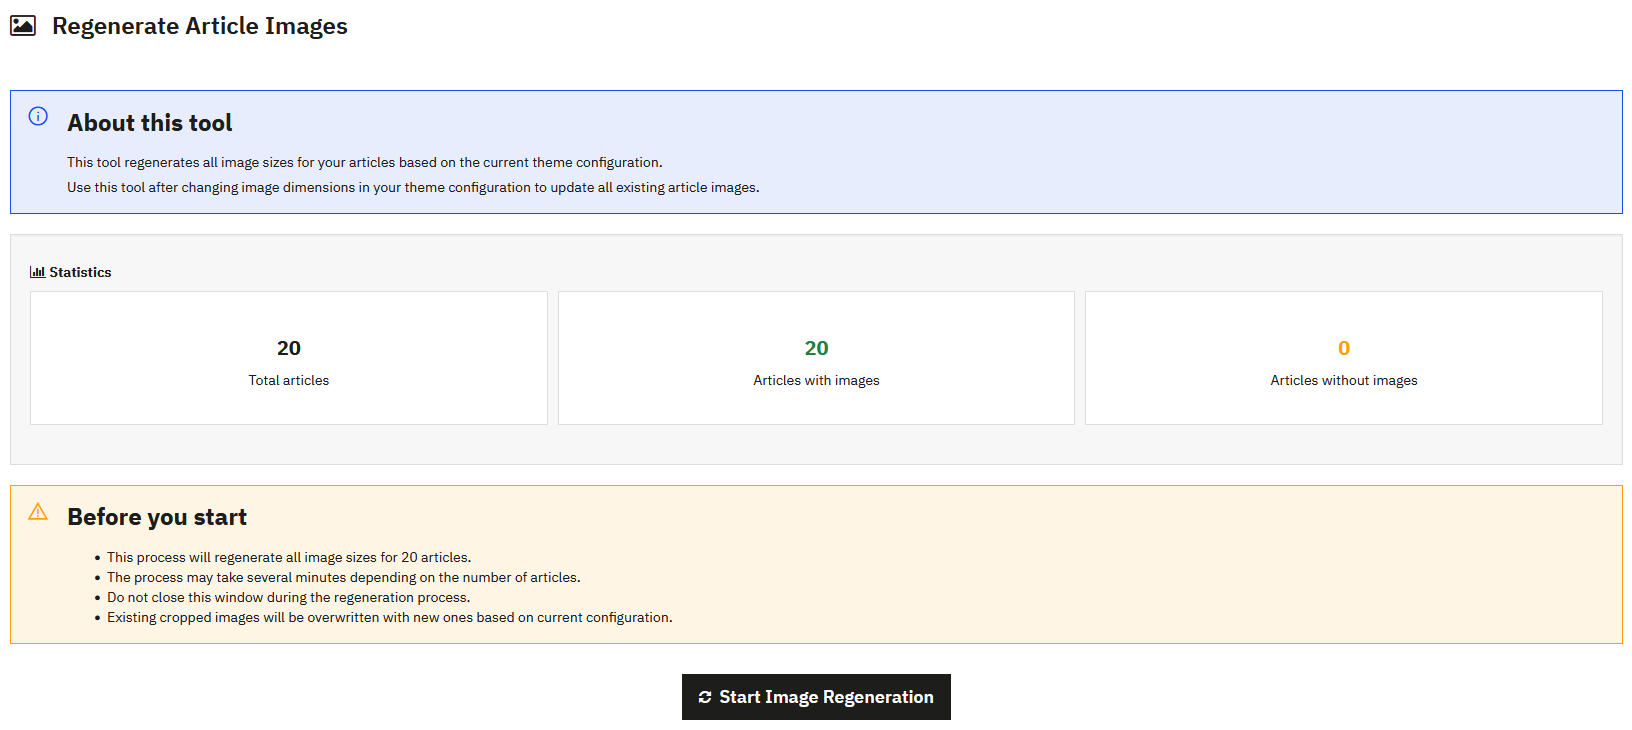
Statistics
Before starting regeneration, the tool displays an overview of your content:
- Total articles: total number of articles in your blog
- Articles with images: number of articles with a featured image
- Articles without images: number of articles without a featured image
Important to Know Before Starting
- The process regenerates all image sizes for all concerned articles
- Existing cropped images will be overwritten
- If you had made custom manual crops, they will be lost
- Do not close the browser window during the process
- Make a backup of your image folder before starting regeneration
Progress Tracking
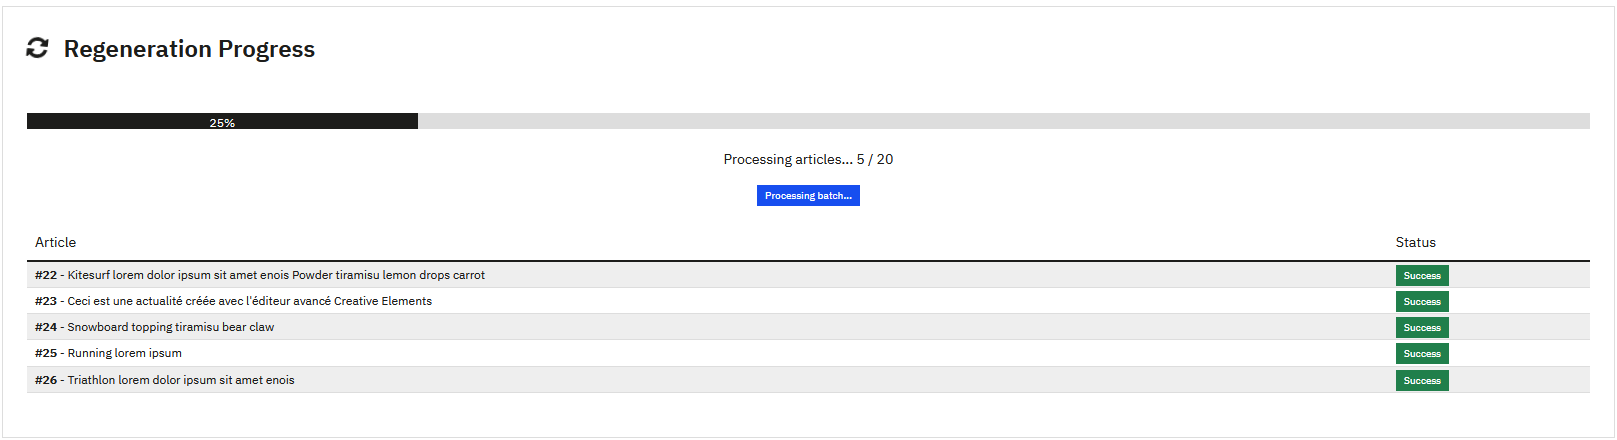
A real-time progress bar displays, indicating:
- Completion percentage
- Number of articles processed
- Processing status of each article
Note
This tool only regenerates article featured images. Images inserted in article content are managed directly by PrestaShop.
Sitemap
The sitemap is an XML file that lists your blog's URLs to facilitate their indexing by search engines.
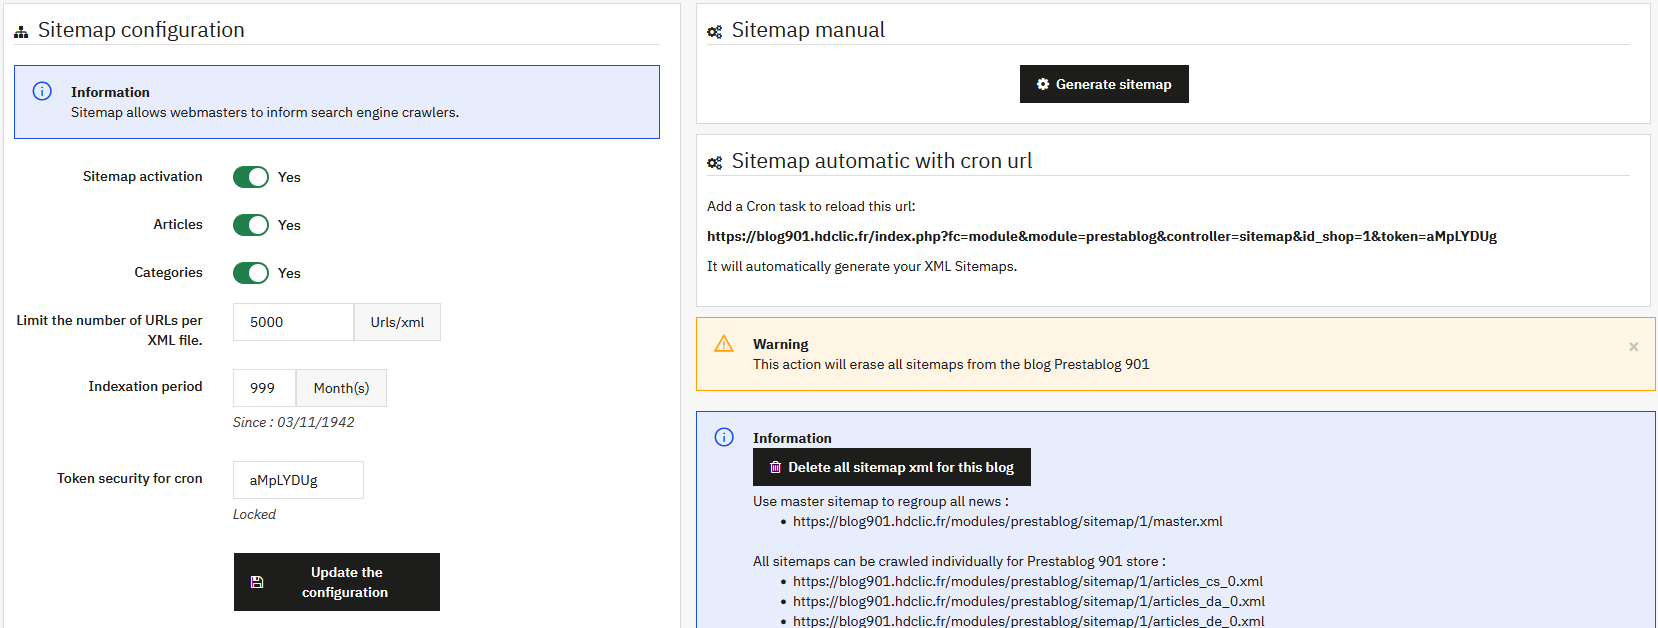
How It Works
PrestaBlog automatically generates multiple sitemap files:
- One sitemap file per activated language (e.g.: articles_fr_0.xml, articles_en_0.xml)
- One sitemap file per category if necessary
- A
master.xmlfile that groups all other sitemaps
Sitemap Configuration
- Sitemap activation: enables or disables sitemap file generation
- Articles: includes articles in the sitemap
- Categories: includes categories in the sitemap
- Limit URLs per XML file: maximum number of URLs per file (5000 by default, recommended value by Google)
- Indexing period: period covered by the sitemap
Manual Sitemap Generation
After enabling and configuring the sitemap, you must generate it once manually by clicking the "Generate sitemap" button.
XML files will be created in the modules/prestablog/sitemap/ folder.
Automatic Generation with Cron Task
To automatically update your sitemap, configure a cron task with the URL provided in the interface. You can use the "Cron tasks editor" module provided free by PrestaShop.
Don't configure too high a frequency. If you don't publish several articles per day, a weekly or monthly update is more than sufficient.
Accessing Sitemap Files
The main master.xml file groups all other sitemaps.
Use this file in your webmaster tool (Google Search Console, Bing Webmaster Tools, etc.) to submit your entire blog.
Robots.txt File Configuration
By default, PrestaShop prevents indexing of the /modules/ folder. To allow access to the sitemap, add the following line to your robots.txt file:
Allow: /modules/prestablogOnce the robots.txt file has been modified, the time it takes to be taken into account can vary from a few hours to several days, depending on the size of your site and how often search engines visit it.
Is Sitemap Necessary for Your Blog?
If your blog contains few articles, the sitemap is probably not essential. However, for a large-scale blog with many articles and categories, the sitemap becomes a valuable tool to ensure complete and efficient indexing.